
The source of an Excel material report is an XML file. The components and their attributes to be collected from the file, as well as the data sorting and the sheet layout, are defined in a template report (an XLSX file). The data is collected from the XML file by using the XPath query language.
You can define your own template reports by using the template reports of the system as an example. Editing the templates requires that:
-
You know how to use Microsoft Excel.
-
You are familiar with the structure of the XML file generated by Vertex.
-
You know the syntax of the XPath language.
More information about the XPath language from here, for example:
You can test the functionality of the XPath expression here, for example:
https://codebeautify.org/Xpath-Tester
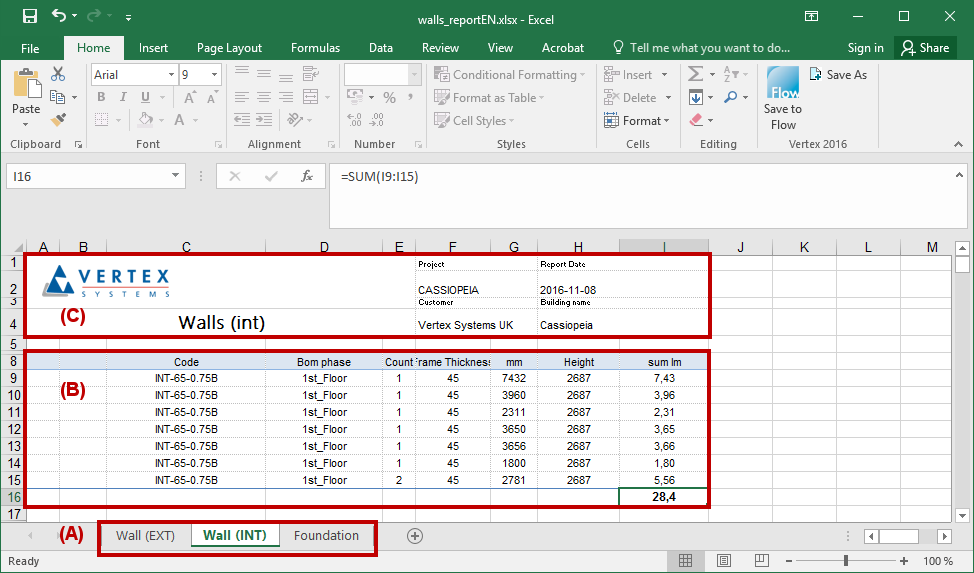
One template report may contain several sheets (A) to which different data can be collected. One sheet, in turn, can contain several listings (B). Standard texts can be added to a template report, as well as data from the project's database or from the system (C).
Cell Ranges in a Sheet
There can be different cell ranges in a sheet, for example:
-
Sheet definition range
-
Data range
-
Data range parts: header, columns, rows, summary
-
Ranges to which data is collected from the project or from the system.
-
Print area
-
Print titles
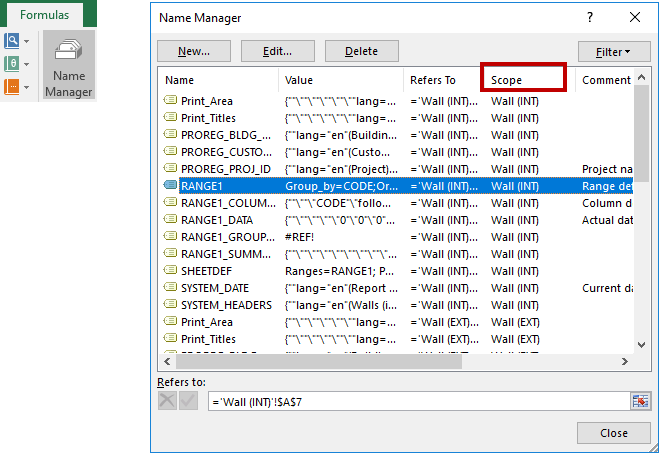
The scope of each cell range must be the sheet in question. Make sure that the scope is correct by using the Name Manager tool of Excel. When you add a named cell range, select the name of the sheet from the Scope list.
Sheet Definition
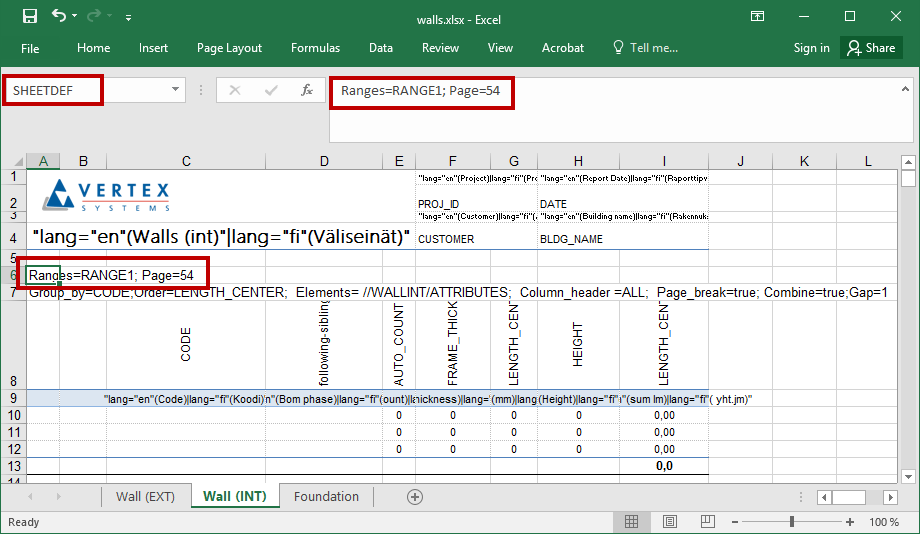
The data is collected from the source file to the data ranges defined in the sheet. One sheet may contain several data ranges. The number and names of the data ranges are set in the sheet's definition range, which must be named as SHEETDEF. Following keywords, separated with a semicolon (;), are available in the definition range:
|
Key |
Description |
Example |
|
Ranges |
Data ranges for defining the data groups. Separate several data ranges from each other with the vertical bar character (|). |
Ranges=RANGE1Ranges=RANGE1|RANGE2 |
|
Page |
Maximum row number on a page, after which a page break is added. |
Page=54 |
|
PROTECT |
Sheet protection. The value can be TRUE or FALSE. |
PROTECT=TRUE |
Data Range Definition
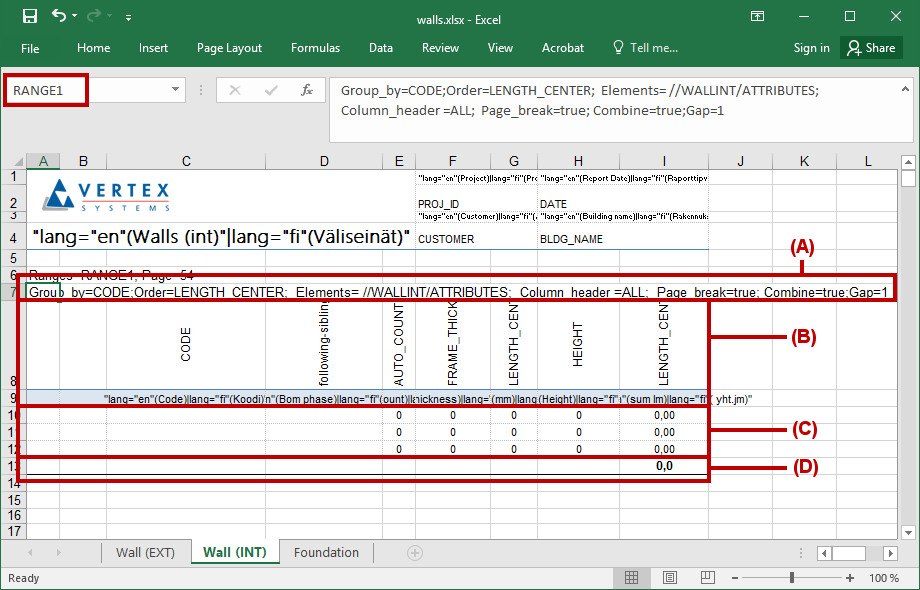
The name of the data range must be the same as entered in the sheet definition range, for example RANGE1.
The data range definition row (A) determines what is to be collected from the source file, how the rows of the listing will be grouped, what is the order of the rows, etc. The column range (B) determines the columns of the listing and their headers. The data collected from the source file is listed on the data row range (C). The data range may include a summary range (D) and a header range (not shown in the example figure).
Data Range Definition Row
The definition row consists of several XPath expressions and keys for defining the layout. Please note, that the XPath expressions are case-sensitive. The order of the keywords is not significant. Following keywords, separated with a semicolon (;), are available:
|
Key |
Description |
Example |
Function |
|
Element_group |
Basic group from which the elements will be collected. The value of the key is an XPath expression. Several targets can be collected by separating the values with the vertical bar (|). |
Element_group=//WALLELEMENT; |
XPath |
|
Elements |
Elements to be collected. The value of the key is an XPath expression. Several targets can be collected by separating the values with the vertical bar (|). |
Elements=.//FRAMEPIECE/ATTRIBUTES; Elements=//WALLEXT|//WALLINT; |
XPath |
|
Sort |
Sort according to this field. Several sort conditions are separate with the vertical bar (|). |
Sort=./ATTRIBUTES/CODE|./ATTRIBUTES/LENGTH_CENTER; |
XPath |
|
Order |
Sort in ascending or descending order. |
Order=Descending;Order=Ascending; |
Layout definition key |
|
Group_by |
Divide the data into groups according to this field. |
Group_by=CODE; |
XPath |
|
Group_order |
Sort the groups in ascending or descending order. |
Group_order=Descending;Group_order=Ascending; |
Layout definition key |
|
Element_combine |
Combine the element groups according to the result of this XPath query. |
Element_combine=./ATTRIBUTES/ITEM_ID; |
XPath |
|
Element_sort |
Sort the element groups according to the result of this XPath query. |
Element_sort=./ATTRIBUTES/ITEM_ID; |
XPath |
|
Element_order |
Sort the element groups in ascending or descending order. |
Element_order=Descending;Element_order=Ascending; |
Layout definition key |
|
Group_Page_Break |
If the value is TRUE, add a page break after each group when printing. |
Group_Page_Break=true; |
Layout definition key |
|
Column_header |
If the data has been grouped, add a header row for each group. |
Column_header=all; |
Layout definition key |
|
Continuous_num |
Use a continuous numbering for groups, TRUE or FALSE. |
Continuous_num=true; |
Layout definition key |
|
Combine |
Combine similar rows and set the number of combined rows to the variable AUTO_COUNT. |
Combine=true; |
Layout definition key |
|
Gap |
Empty rows between groups. |
Gap = 2; |
Layout definition key |
|
Page_break_style |
If the value is TRUE, use the style of the last row before page break, and the style of the first row after page break. |
Page_break_style=true; |
Layout definition key |
|
Page_break |
If the value is TRUE, add a page break after each element group when printing. |
Page_break=true; |
Layout definition key |
|
Write_empty_group |
By default, the system does not write groups without data rows, unless the value of the key Write_empty_group is set to TRUE |
Write_empty_group=true; |
Layout definition key |
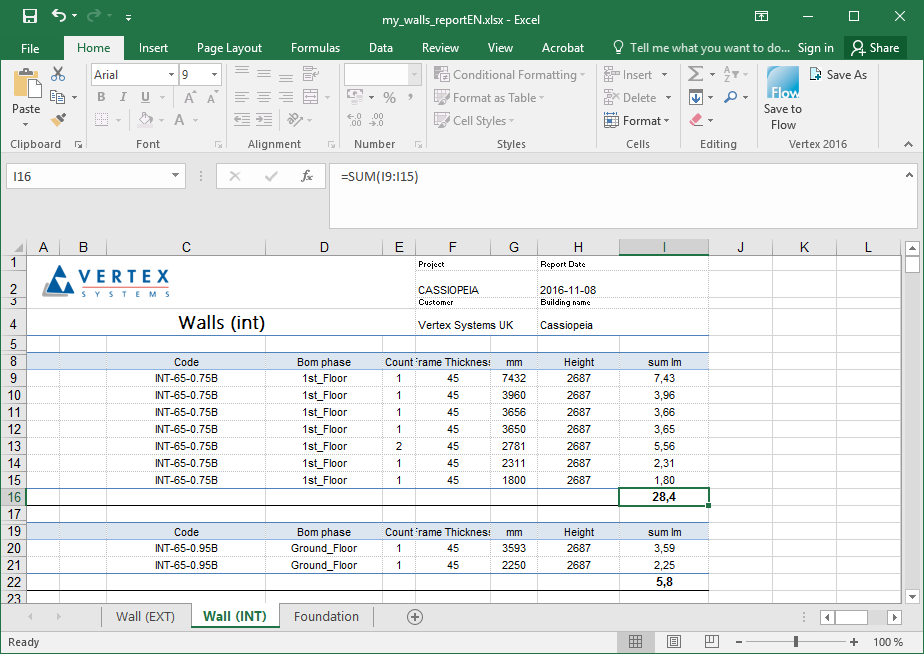
Example 1
Elements=//WALLINT/ATTRIBUTES;Group_by=CODE;Sort=LENGTH_CENTER;Order=Descending;Column_header =all;Combine=true;Gap=1
|
Key |
Explanation |
|
Elements=//WALLINT/ATTRIBUTES; |
Collect all WALLINT elements, and the child element ATTRIBUTES of each WALLINT element. |
|
Group_by=CODE; |
Group the data according to the ATTRIBUTES element's child element CODE. |
|
Sort=LENGTH_CENTER;Order=Descending; |
Sort the rows in the group according to the child element LENGTH_CENTER in descending order. |
|
Column_header =all; |
Add a header row for each group. |
|
Combine=true; |
Combine similar rows and set the number of combined rows to the column AUTO_COUNT. |
|
Gap=1; |
Add an empty row between the groups. |
Final listing:
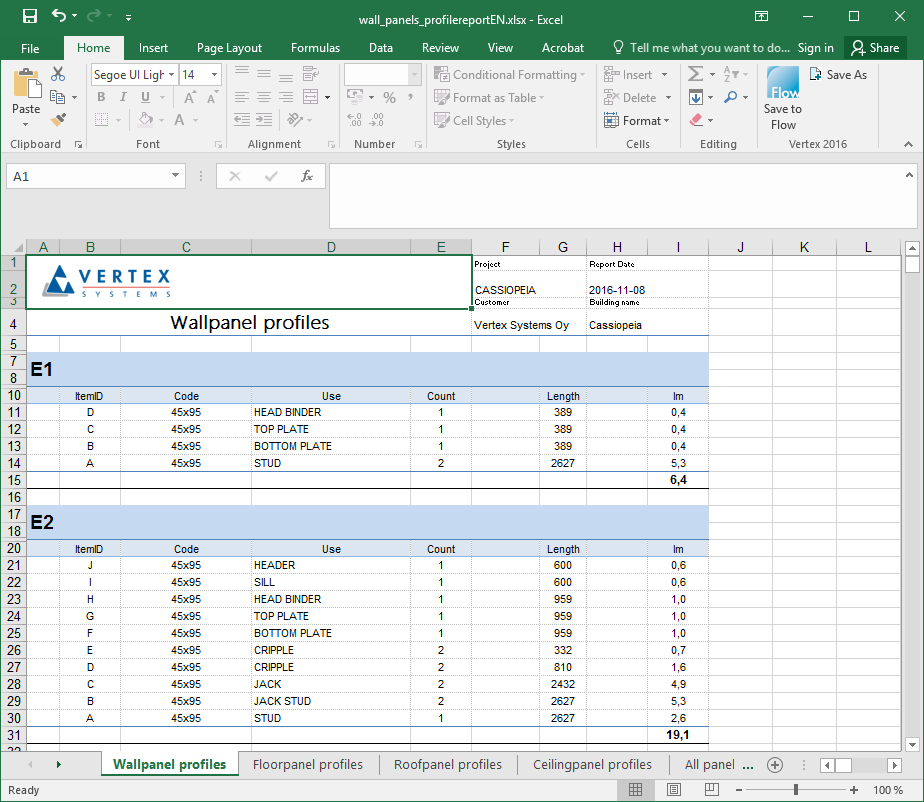
Example 2
Element_group=//WALLELEMENT;Elements=.//FRAMEPIECE/ATTRIBUTES;Element_sort=./ATTRIBUTES/ITEM_ID; Group_by=CODE;Sort=ITEM_ID|LENGTH;Order=Descending;Column_header =all;Combine=true;Gap=1;Page_break=true;
|
Key |
Explanation |
|
Element_group=//WALLELEMENT; |
Collect all WALLELEMENT elements. |
|
Elements=.//FRAMEPIECE/ATTRIBUTES; |
From each WALLELEMENT element, collect the child element FRAMEPIECE and its child element ATTRIBUTES. |
|
Element_sort=./ATTRIBUTES/ITEM_ID; |
Sort according to the WALLELEMENT element's child element ATTRIBUTES/ITEM_ID. |
|
Group_by=CODE; |
Group the parts formed like this according to the FRAMEPIECE/ATTRIBUTES element's child element CODE. |
|
Sort=ITEM_ID| LENGTH;Order=Descending; |
Sort the rows in the group according to the FRAMEPIECE/ATTRIBUTES element's child element ITEM_ID and LENGTH in descending order. |
|
Column_header =all; |
Add a header row for each group. |
|
Combine=true; |
Combine similar rows and set the number of combined rows to the column AUTO_COUNT. |
|
Gap=1; |
Add an empty row between the groups. |
|
Page_break=true; |
When printing, add a page break after each element group. |
Final listing:
Example 3
Elements= //FRAMEPIECES/*/ATTRIBUTES[MAT_CODE[contains(text(),'KP')] and CODE[not (contains(text(),'KP 45x200'))]];Group_by=CODE;Sort=LENGTH_CENTER;Order=Descending;Column_header =all;Combine=true;Gap=1
|
Key |
Explanation |
|
Elements=//FRAMEPIECES/*/ATTRIBUTES |
Collect all FRAMEPIECES elements, and the child element ATTRIBUTES of each FRAMEPIECE element. |
|
[MAT_CODE[contains(text(),'KP')] and CODE[not (contains(text(),'KP 45x200'))]]; |
Filter the attribute MAT_CODE to contain the text KP but not KP 45x200 |
|
Group_by=CODE; |
Group the data according to the ATTRIBUTES element's child element CODE. |
|
Sort=LENGTH_CENTER;Order=Descending; |
Sort the rows in the group according to the child element LENGTH_CENTER in descending order. |
|
Column_header =all; |
Add a header row for each group. |
|
Combine=true; |
Combine similar rows and set the number of combined rows to the column AUTO_COUNT. |
|
Gap=1; |
Add an empty row between the groups. |
Column Range Definition
The name of the column range must be <data_range_name>_COLUMNS, for example RANGE1_COLUMNS.
The first row contains the XPath expressions for collecting the data from the source. The second row defines the column headers shown in the final report.
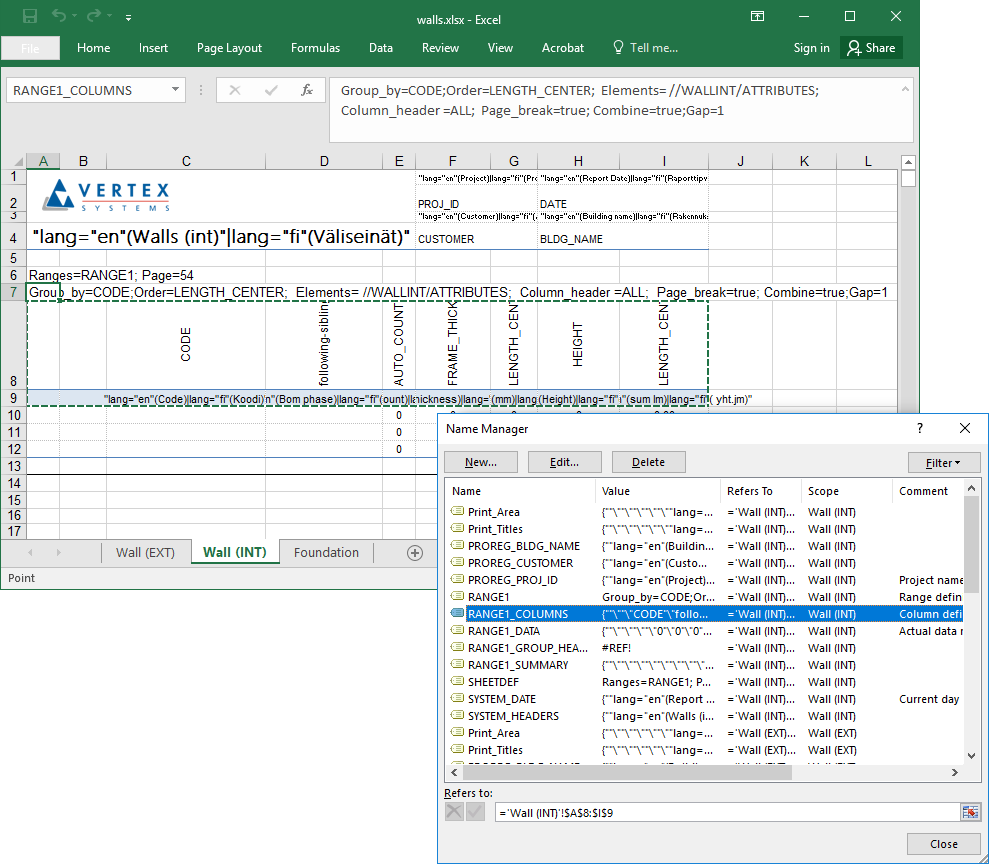
Special columns are:
|
AUTO_ITEM |
Automatic numbering of rows |
|
AUTO_COUNT |
Number of combined rows. See the key Combine. |
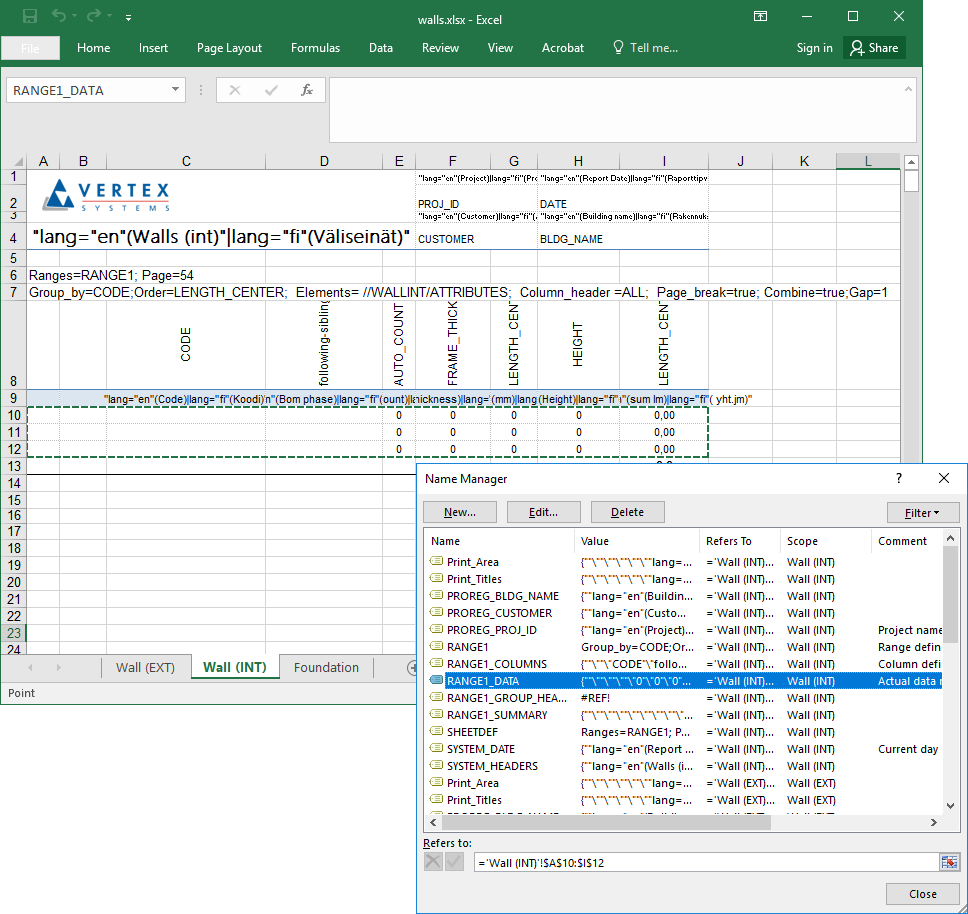
Data Row Definition
The name of the data row range must be <data_range_name>_DATA, for example RANGE1_DATA. The height of the data row range must be three rows.
A cell in the data row range may contain a formula. The formula can refer to the cells only on the same row, for example =E10*G10/1000.
Group Header
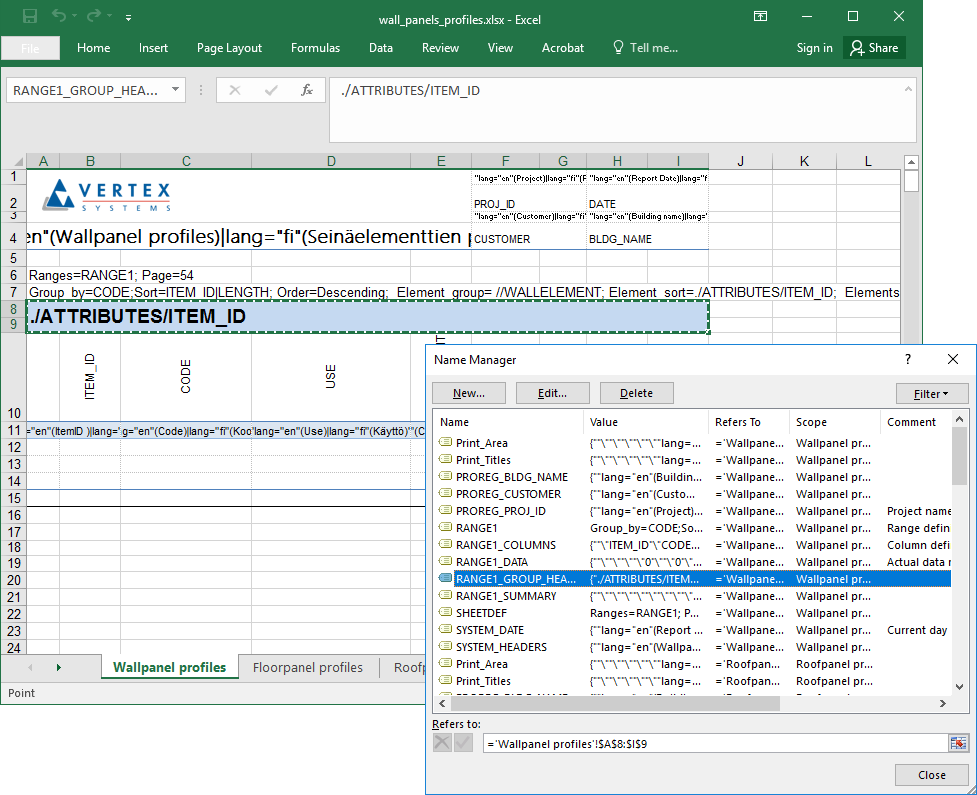
A group can have a header range. Its name must be <data_range_name>_GROUP_HEADER. A group header may contain an XPath expression or a character string. The character string must be separated from the XPath expression by using double quotes (").
Group Summary
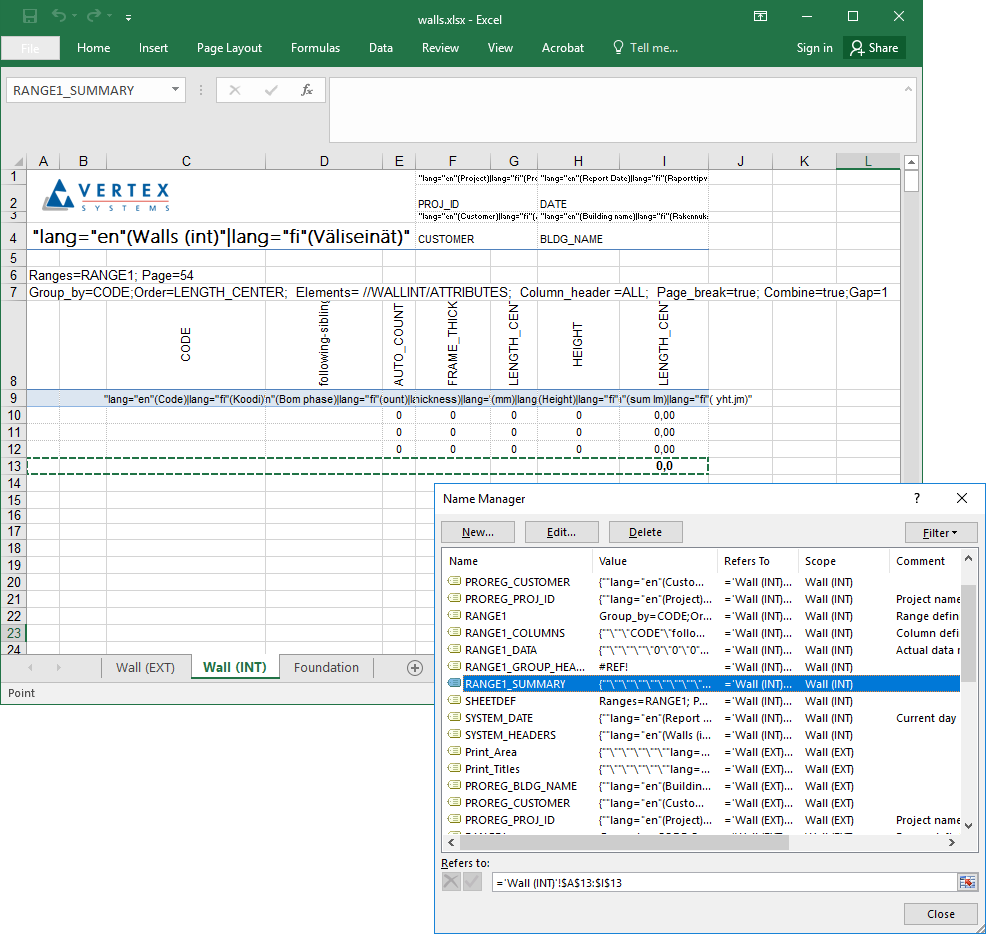
A group can have a summary range. Its name must be <data_range_name>_SUMMARY. A summary range may contain formulas. The formulas can refer to all the rows in the data range, for example =SUM(I10:I12).
Single Values
Besides the elements collected from the XML file, other data can also be retrieved into the sheet.
-
Other data from the XML file
-
Data from the project's database
-
System values
-
Constant values such as text
Data From XML File
If other data besides the elements to be collected is pulled from the XML source file, the name of the range must be XML_<unique_name>. The content of a cell in the named range must be an XPath expression for getting the value from the XML file. For example, if a data element DATE is needed, the name of the range can be XML_DATE, and the content of the cell an XPath expression //DATE.
Data From the Project's Database
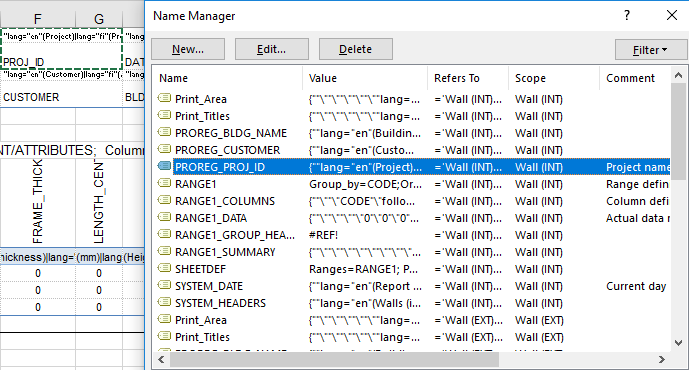
Project data can be added by naming the range in the format PROREG_<unique_name>. The contents of the cells in the named range is retrieved from the database fields. For example, if the name of the project is needed, the name of the range can be PROREG_PROJ_ID, and the content of the cell PROJ_ID.
System Values
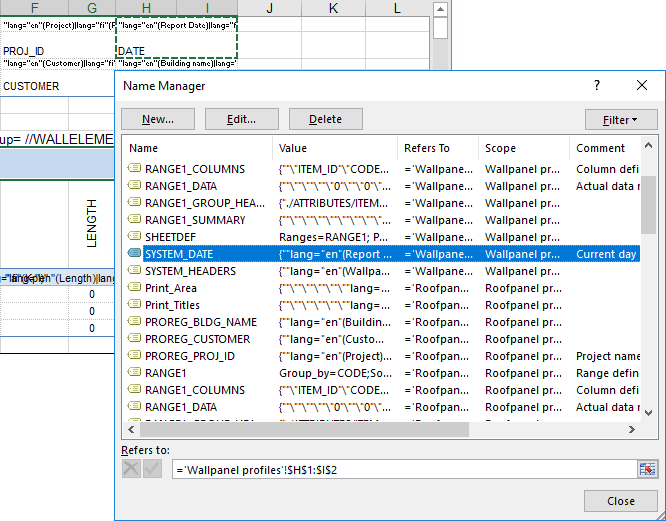
System data can be added by naming the range in the format SYSTEM_<unique_name>. The content of a cell in the named range must be equivalent to one of the following pre-defined values:
-
USER
-
COMPUTER
-
DATE
-
DATE_LOCAL
-
DATE_PROJECT
-
APPLICATION
-
REVISION
-
REVISION_LONG
-
TIME
Constant Values
A named range can also include constant values. A constant value can be a text written inside double quotes, for example. The text is output without quotes in the final sheet.
Quotes are not needed outside a named range.
Multi-lingual Constant Values
A constant value can be defined as multi-lingual. This enables producing reports in different languages from the same template sheet. The user will select the language in which the report will be generated.
The syntax is:
"lang="xx"(<text in xx language>)|lang="yy"(<text in yy language>)|…"
xx and yy are standard codes, for example fi or en (http://www.w3schools.com/tags/ref_language_codes.asp).
Example:
"lang="en"(Count)|lang="fi"(Lukumäärä)"
Print Area and Print Titles
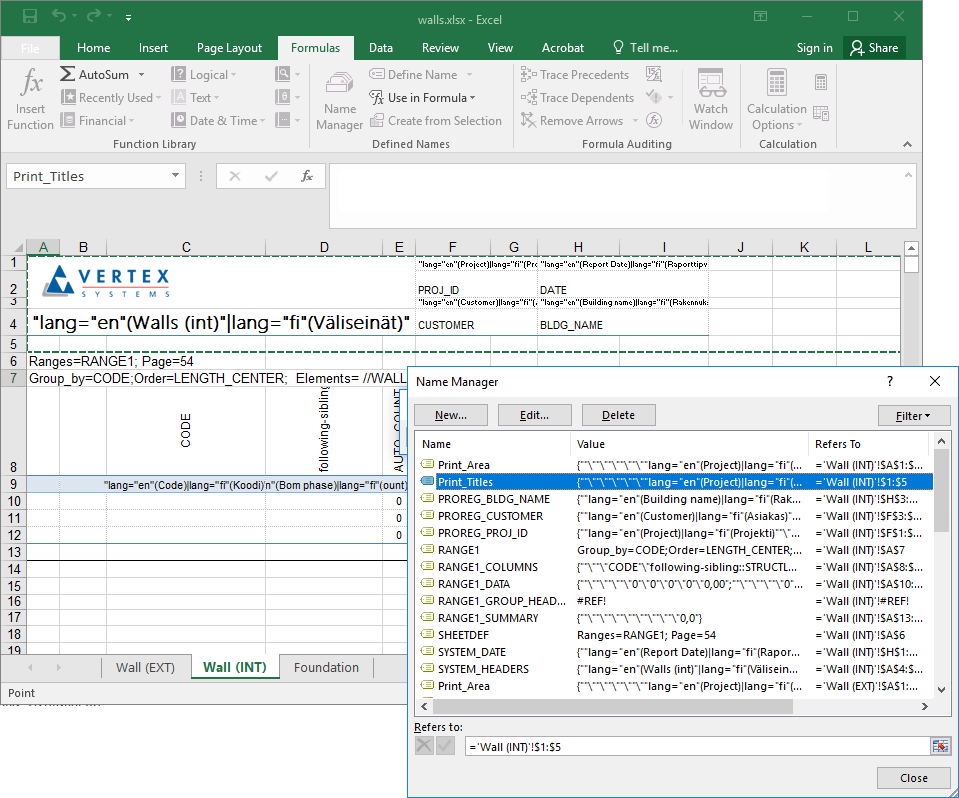
You can define a print area and print titles on the sheet by using the functions on the Page Layout tab in Excel.
Excel will automatically add the cell ranges Print_Area and Print_Titles to the Name Manager list. You can also define the ranges in the same way as other named ranges by using the Name Manager tool.
Header and Footer
You can add a header and a footer to the template report in the usual way by using the Excel functions. They can include a page number, date and other items available in Excel.
You can also add dynamic text to a header or footer. The syntax is:
#<source_prefix><expression>#
The prefix <source_prefix> is the same as when adding single values: SYSTEM_, PROREG_ and XML_.
For example:
#PROREG_PROJ_ID# adds the value of the PROJ_ID field in the PROREG database.