
Transfer functions
Transfer tools are collected together to SolidWorks ribbon under the Transfer to Vertex Flow tab.
Functions are also shown in SolidWorks menu Tools > Transfer to Vertex Flow
Transfer models, drawings and items to Excel

Then manually set item codes and edit metadata in Excel before importing to Flow.
Flow for SolidWorks creates a compressed folder that you can import to Flow using Flow import tools.
Transfer models, drawings and items to Flow

The function...
-
selects drawings in the same directory, which has a connection to the model. In other words, the drawing can be located in the same folder as the model or in subfolders
-
transfers recursively
-
creates items or links existing items. If an item structure exists, it will not be overwritten by the program.
Item codes can be the same as model names, taken from code series or handwritten.
You have to transfer models before or at the same time as drawings to get drawings and models linked together. It is recommended to transfer models and drawings simultaneously
Transfer drawings to Flow

The folder can contain models which will be ignored. The function creates a link to the model if the model is already transferred to Flow. The function doesn't create items or structures.
Before using this function, related models and items must be transferred to Flow using model and item transfer as described above.
Transfer models and drawings without items to Flow

The function does not create or link items or structures. Use function e.g. when you want to transfer the model of the purchased component to Flow and link it later to an item in Flow.
Transfer to Flow using setting dialog

Copy models and drawings using new Flow codes

The function takes new codes from the Flow series and does not transfer models and drawings to Flow.
When you create a new code for the assembly, the parts and subassemblies will also get a new code. References in the selected assembly are updated to renamed parts. If the assembly parts are used in some other assemblies as well, the references in those assemblies must be updated manually by user.
Transfer principles
-
During transfer, the program sets model's custom properties to item metadata, and the drawing's custom properties to drawing metadata in Flow
-
The program will not transfer drawing if it includes a model view, and the model is not included in the same transfer or the model has not transferred before
-
About configurationsThe transfer function proposes creating a new item for the specific configuration of the part used at assembly, not for the other configurations.You can create an item for other configurations when they are used in some other transferrable assembly or transfer model separately, in which case the program offers an opportunity to transfer all configurations.You can deselect unnecessary item rows in case you don't want to transfer some configuration. You can also remove rows from the transfer window using the delete button.
-
Item codes can be the same as model names, taken from code series or handwritten.
-
The program generates OBJCODES for parts, drawings, and assemblies based on their filenames.
-
Transferable models and drawings must be closed in SolidWorks before transfer!
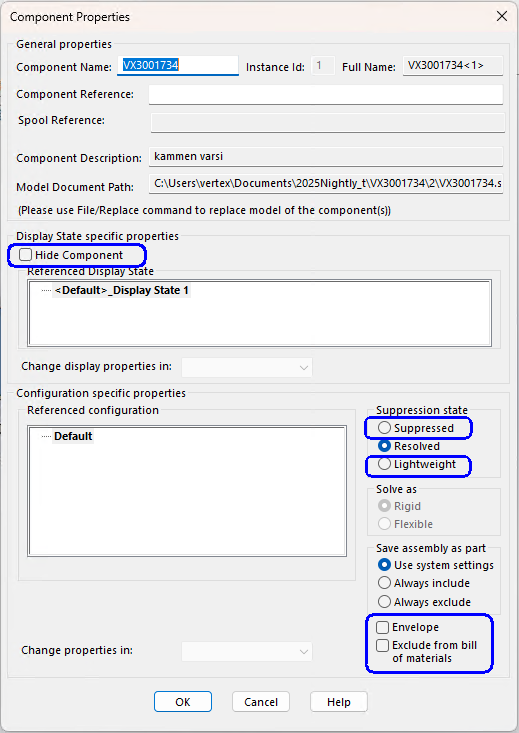
Component properties affect to transfer
These assembly component properties can control transfer:
-
Suppress
-
Lightweight
-
Envelope
-
Exclude from bill of materials
-
Hide
The effect of the settings:
-
All models except suppressed will be transferred to Flow and suppressed models will not generate items
-
Only items of lightweight and hidden models will appear to the item structure
-
The content of the assembly is irrelevant, but the setting at the top level determines whether the model will be transferred and whether the item will be transferred to the structure
-
These settings of parts and assemblies work the same way
In the other way
-
Models are transferred to the Flow in Lightweight, Envelope, Exclude from bill of materials and Hide states
-
Items of models in lightweight and hidden state will appear to the item structure
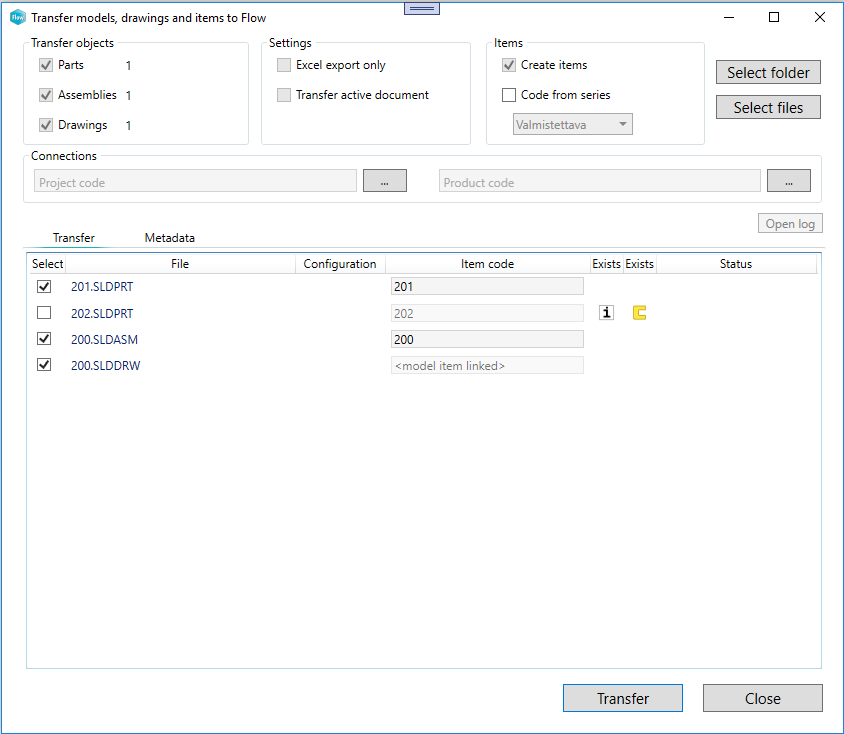
Transfer dialog
Each transfer function opens the same transfer dialog with different preselected options.
The objects column shows how many parts, assemblies, or drawings are selected for transfer.
You can change the following settings in the settings column.
-
Create items: Create item for transferable parts and assemblies.
-
Code from series: Take item codes from selected Flow series. Select this before selecting transferable models.
-
Excel export only: Vertex Flow transfer folder is created by the program, but no files are transferred. Excel export only allows to complete, correct and harmonize existing data in Excel before manual transfer to Flow
-
Transfer active document Transfer the part or assembly that is active in SolidWorks. The function also transfers subassemblies and related drawings
Connection block allows you to select a project or product in which you want to link the transferrable files. The program links all transferrable models and drawing to the selected product or project. From the point of view of product information management, it is not recommended to link all assembly levels to product or project so use connection block wisely. You can verify the connections by viewing the excel files that Transfer models, drawings and items to Excel function creates.
Already existing models or items are marked with a symbol on exists column.
Status column indicates whether the transfer was successful or not.
Use Select files to select transferable parts and assemblies. Assembly sub-parts are selected automatically. You can select entire folders and subfolders by using Select folder. If the folder contains assemblies, the function also transfers parts and sub-assemblies that refer to the assembly even if they are not located in the same folder.
The bottom part of the dialog lists transferable models. Modify individual item codes manually if needed. Deselect items that are not needed. You can also delete items selecting the row and clicking delete from a keyboard.
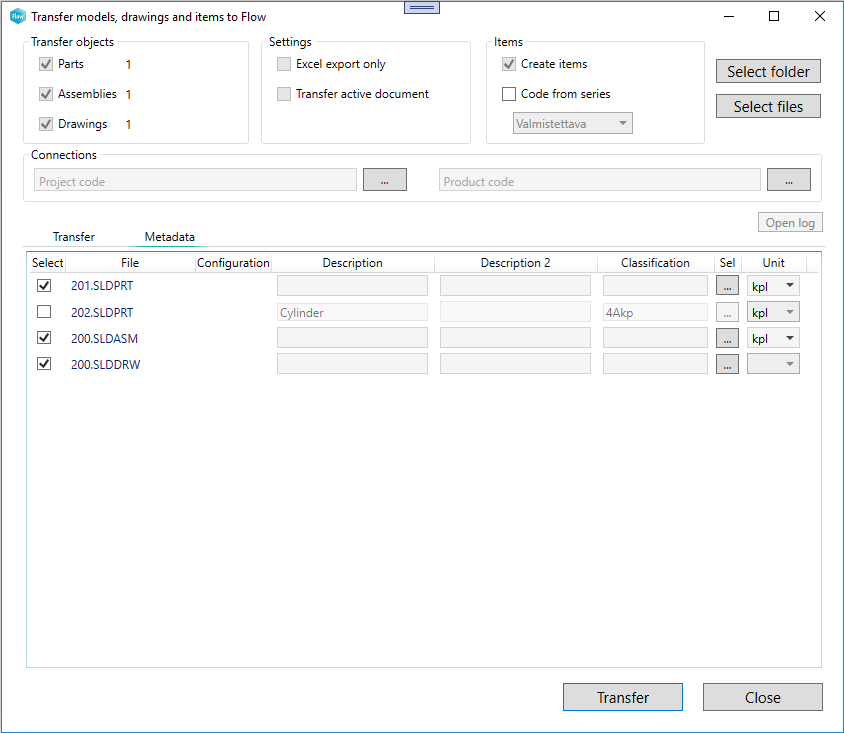
You can fill in the object's attributes using the Metadata tab
-
You can set the attributes for the model, item and drawing: description, description 2, classification and unit
-
The size of the dialog and each field can be stretched
-
The default values of the fields come from the custom properties of the model or drawing
-
Flow's system settings sw.item.custom.property.map and sw.drawing.custom.property.map controls what data is prefilled into the dialog fields
-
The default value of the unit is set by Flow's system setting: sw.default.item.unit
-
If the object is already in Flow, the fields are inactive and show the information in Flow
-
Updating the item, model or drawing in Flow is not possible with the direct transfer function but you can use the Excel transfer instead
-
In the Excel transfer the metadata tab is not available, because the data can be entered in an Excel table
-
Starting the transfer activates the transfer tab, which shows the progress of the transfer
More detailed information about Flow's system settings: Startup definitions and system settings
Different approaches to data transfer
There are a few ways to transfer SolidWorks models and drawings to Flow. The best way depends on how the current design data is organized and how you wish to utilize Flow features to master the data even further. We recommend that you contact Vertex, so that we can choose the best approach for your particular case
Mass transfer
In this case, you transfer all needed drawings and models to Flow during startup project using Transfer models, drawings and items to Excel or Transfer models, drawings and items to Flow function. Excel transfer allows you to edit parts' and drawings' metadata. In addition, excel functions are useful to find and process duplicates or combine data from many different sources. The advantage is that you can find all models and drawings from one place after transfer.
Transfer when needed
In this case, you transfer individual models or assemblies to Flow when needed. You can use some of the functions which have been introduced above. The advantage is that you can start using Flow for SolidWorks easily without extensive data transfer project. This approach is usable when the program is mainly used to create new projects and new models and there is rarely need to review desing data of previous projects.
Transfer from workstation directory
The following steps describe transferring models and drawings to Flow when files are located in the workstation's folders.
The first step is to decide the transfer approach. Approaches are introduced above.
Mass transfer
-
Plan the transferringDecide whether to use existing items or create new items. It is not recommended to use Flow without items. You have the option to get a new item code (number) from Flow series for each model (and the linked drawing) on the fly or generate the code with the same number as the model itself.If you want to transfer models and related drawings at the same time, make sure that they are located in the same folderRename or remove duplicates - make sure that the references are updated after renamingDecide what kind of metadata you want to add to the objects e.g. what type of classification (item group, etc). to use with items and whether you want to connect the items to a product or a project
-
Use Transfer models, drawings and items to Excel tool to create zip folder. You can also use function Transfer models, drawings and items to Flow It is recommended not to transfer all files at once. Instead, transfer data in smaller batches e.g. one assembly at the time. Depending on your workstation resources roughly 1000-5000 models max at a time keeps you on the safe side.
-
Complete the metadata in Excel if you have used the function Transfer models, drawings and items to Excel
-
Use Flow import tool to transfer the zip file containing models and drawings and their metadata.
Transfer when needed
-
During Flow for SolidWorks startup project
Decide whether to use existing items or create new items.Document practices and instruct users on how transfer should be madeIt is a good practice to transfer commonly used components to Flow already in the implementation phase -
When transferringIf you want to transfer models and related drawings in the same time, make sure that they are located in the same folderRename files if files with the same filenames are already transferred
Transfer from another PDM system
Transferring files from another PDM system should be planned on a case-by-case basis. The basic rule is that models must first be exported from PDM to the workstation from which the transfer is made. Alternatively, the workstation must have access to the network drive where the exported files are. Model related metadata needs to be exported or converted to Excel readable form and harmonized to match Flow's fields. It is also possible to use XML import if metadata is in XML format.
After this, the transfer of files can be done the same way as in the previous case.