

Exercise 1: Model struture
The main objective of this exercise is to create the main assembly and model structure for your plant. The main assembly consists of three separate sub-assemblies. You are going to use these sub-assemblies in future exercises.
The estimated time to complete this exercise is 10 minutes.
This exercise was carried out with Vertex G4Plant 31.0 (2025).
In this exercise, you will learn to
-
How to create a model structure
-
How to add a new sub-assembly to your main assembly
-
Settings of sub-models and sub-parts
-
Levels of hierarchy and how to "move" between them
Functions in Use
-
File > New > Assembly
-
Context-sensitive function: New... > Assembly
-
Context-sensitive function: Properties
-
Save
Create new assembly
-
Let's create first the project's main assembly model.
-
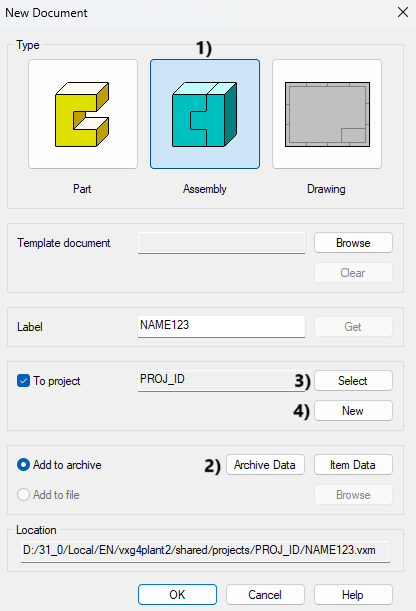
Feature File > New.
-
Select the document type as Assembly, in picture 1).
-
Type model's label as EXP-MAIN.
-
Fill the archive data (button Archive Data) in picture 2).
-
Select an existing project or creare a new project.
-
Select = Browse through existing projects and select one, in picture 3).
-
New = Create a new project called EXP and fill the projects data, in picture 4).
-
-
Press OK.
Hide or restore auxiliary planes of assembly
The feature tree of the assembly has similar auxiliary planes as the part models.
-
Hide auxiliary plane or planes with right-click function: Hide or Hide chosen.
-
Use the right-click function to restore the auxiliary plane or planes: Restore or Restore chosen.
You can use the auxiliary planes of assembly for locate parts. Auxiliary planes were introduced in assemblies in version 25.0.00 (Vertex 2019).
-
Until version 24.0.XX (Vertex 2018), the locking of the part first introduced into the part model was used to position other parts. This is still available, but parts can also be tied to assembly auxiliary levels, so that the first added part can either be removed or removed without the other parts coming off (Of course, provided they are tied to assembly auxiliary planes).
Click an auxiliary plane from feature tree (Not from model).
-
Right-click function: Change size.
-
Enter the size.

Edit system settings (This affects all users using the same Vertex G4 file server).
-
File > System Preferences > Edit > Administrator's view > Group 3d.
Keyword: baseplanesvisiblewhencreated.
-
0 = Auxiliary levels hidden in part and assembly models when a new model is created.
-
1 = Visible in the part model.
-
2 = Visible in the assembly model.
-
3 = Both visible (default)
Create a sub-assembly for building model
-
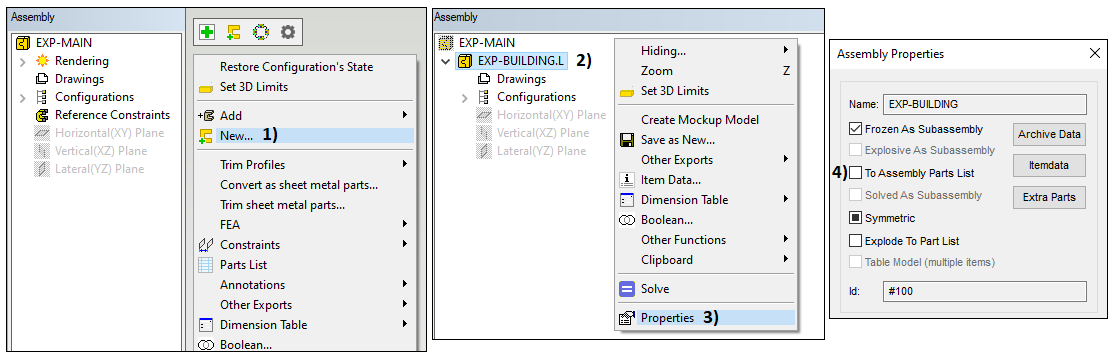
Context-sensitive function (Working window > Right mouse button): New... in picture 1).
-
Select the document type as Assembly.
-
Type model's label as EXP-BUILDING.
-
Fill in the archive data (button Archive Data).
-
The program proposes the active project for the document.
-
OK.
You have now created a new sub-assembly under the main assembly. The sub-assembly is visible on a different level on the assembly tree than the main assembly, in picture 2). Next, you will modify the properties of the building model:
-
Select the building model from the tree.
-
Context-sensitive function: Properties, in picture 3).
-
Disable the check-box To Assembly Parts List, in picture 4).
-
OK.
Return to the main assembly level on the model > Working window > Right mouse button > OK. This action will save the changes of the sub-assembly to the archive.
Create a sub-assembly for equipment
-
Context-sensitive function: New...
-
Select the document type as Assembly.
-
Type model's label as EXP-EQ.
-
Fill in the archive data (button Archive Data).
-
The program proposes the active project for the document.
-
OK.
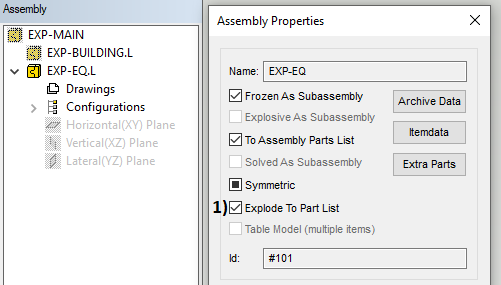
You have now created the second sub-assembly under the main assembly. The sub-assembly is visible on a different level on the assembly tree than the main assembly, but on the same level as the building model. Next, you will modify the properties of the equipment model:
-
Context-sensitive function: Properties.
-
Enable the check-box Explode To Part List, in picture 1).
-
OK.
Return to the main assembly level on the model > Working window > Right mouse button > OK. This action will save the changes of the sub-assembly to the archive.
Create a sub-assembly for pipelines
-
Context-sensitive function: New...
-
Select the document type as Assembly.
-
Type model's label as EXP-PIPELINES.
-
Fill in the archive data (button Archive Data).
-
The program proposes the active project for the document.
-
OK.
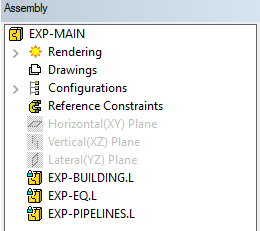
You have now created the third sub-assembly under the main assembly. The sub-assembly is visible on a different level on the assembly tree than the main assembly, but on the same level as the other two models. Next, you will modify the properties of the pipeline model:
-
Context-sensitive function: Properties.
-
Enable the check-box Explode To Part List.
-
OK.
Return to the main assembly level on the model > Working window > Right mouse button > OK. This action will save the changes of the sub-assembly to the archive.
Save model
-
File > Save or click


You can download here the result of exercise 1 (EXP-MAIN.vxz). (22 KB)
This transfer package will create a project EXP and insert those four models from the exercise into the archive.
We don't recommend using this package if you already conducted the exercise by using the same labels for the project and models as guided.