


These reforms are presented in the Vertex Cad major version 28.0.00 (vx. 2022)
Manual additions to environmental files
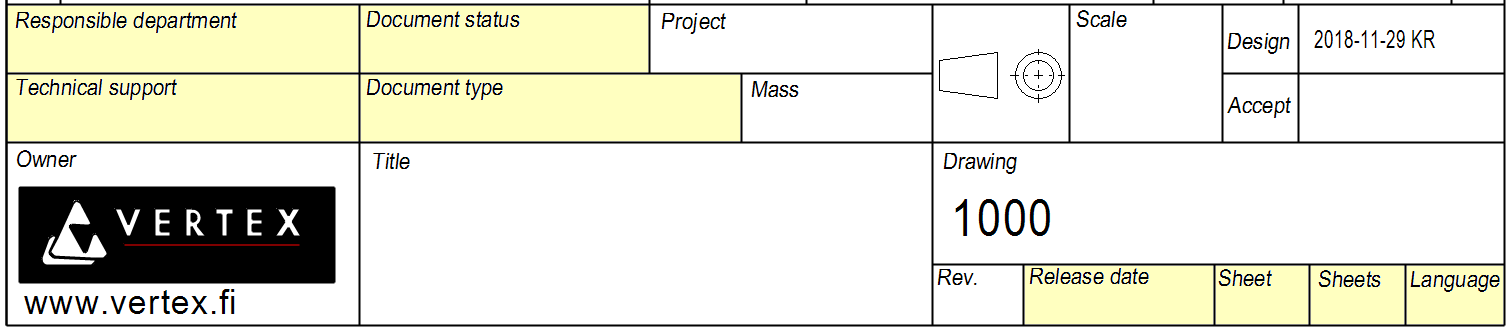
The drawing archive complies with the ISO 7200 standard
We updated the contents of the drawing archive (d_PICREG) database and related display files and utilities to support ISO 7200-compliant fields.
According to the standard, there are 8 mandatory fields and they are:
-
Owner. (This is the field with the company logo and contact information)
-
Identification number (i.e. Drawing number)
-
Release date.
-
Block / sheet number.
-
Title (i.e. Description).
-
Acceptor.
-
Creator. (i.e. Designer)
-
Document type.
Optional fields included in the Vertex G4 drawing archive are:
-
Change ID (i.e. Revision)
-
Number of blocks / sheets.
-
Additional headings (i.e. Description 2 and Description 3).
-
Language code.
-
Responsible department.
-
Technical support (person to provide additional information if necessary).
-
Document status.
-
Keywords.
The title board of the drawing complies with the ISO 7200 standard
Fields have been added to the title board for the following information
-
Responsible department.
-
Technical support.
-
Document status.
-
Document type.
-
Release date.
-
Block / sheet number.
-
Number of blocks / sheets.
-
Language code.
You can use the new sample sheets when you make the sheets that is appropriate for your business. The new sheets can be found in the folders:
-
G4: Symbols/Standards/Sheets_ISO7200
-
G4-Flow: Symbols/Standards/FlowSheets_ISO7200
The Inspected field has been removed from the title table, although it is still left on the archive card.
The drawing archive card has been renewed
New fields have been added to the sheet, but old fields such as Product, Connected to, Previous, and New have also been left there, as they are still in use by some of our customers.
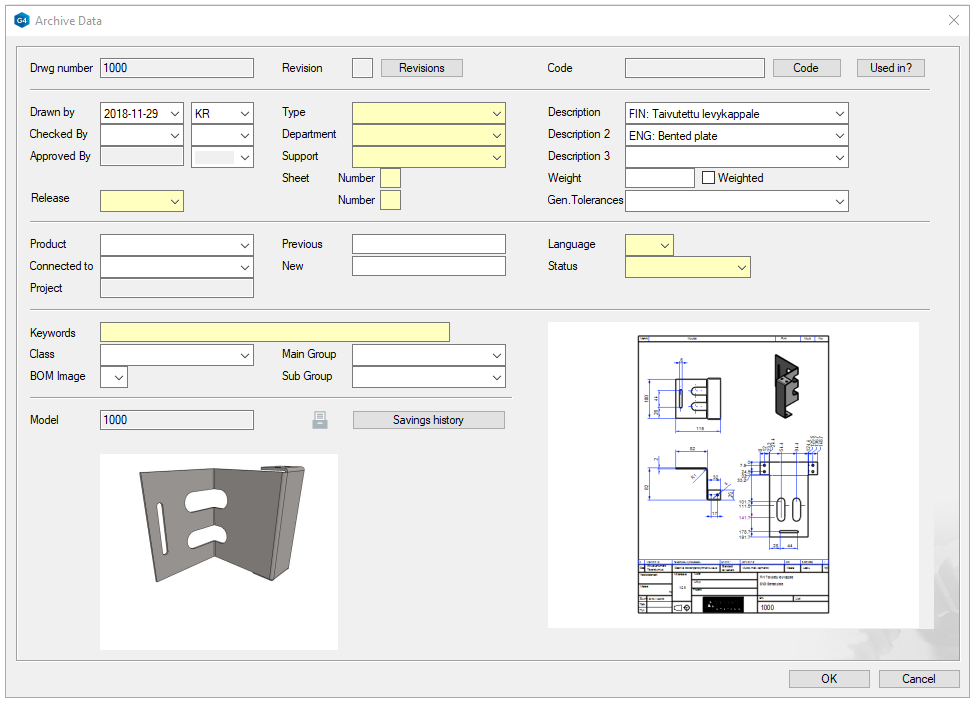
Use the new preselections on the archive card
The following fields have a preselection button that you can use to retrieve information:
-
Type. Retrieving information from the Document Type (d_DOCUMTYPE) database.
-
Department. Retrieving information from the database Department (d_DEPARTMENT).
-
Support. Retrieving information from the user database (d_MBOX_P).
-
Language. Retrieving information from the language database (d_LANGUAGE).
-
Status. Retrieving information from the status database (d_STATUS).
-
Released. Open the calendar application for the release date.
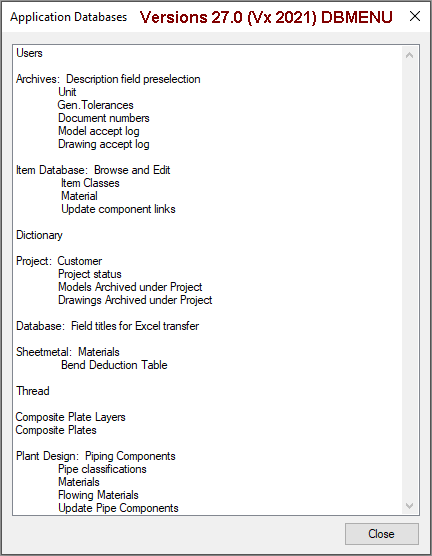
Complete new database content
You can edit the contents of the databases
-
System-ribbon > Application
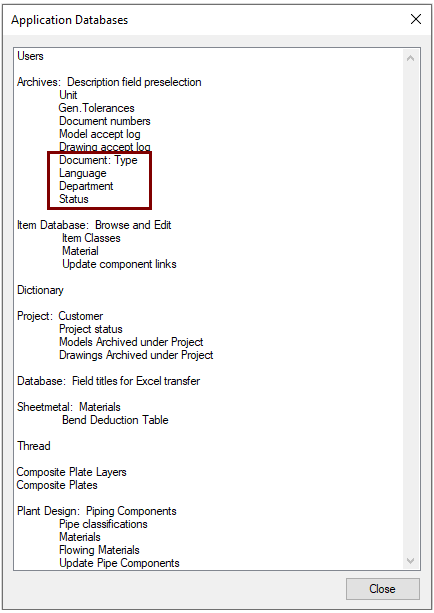
Below are pictures of the interface of the new databases
Manually additions to DBMENU and ALIAS files
Updating the main version of the program does not modify files in the client's shared folder, which may include client-specific changes.
Below are instructions for completing the two files.
Copy the shared/setup/DBMENU file or
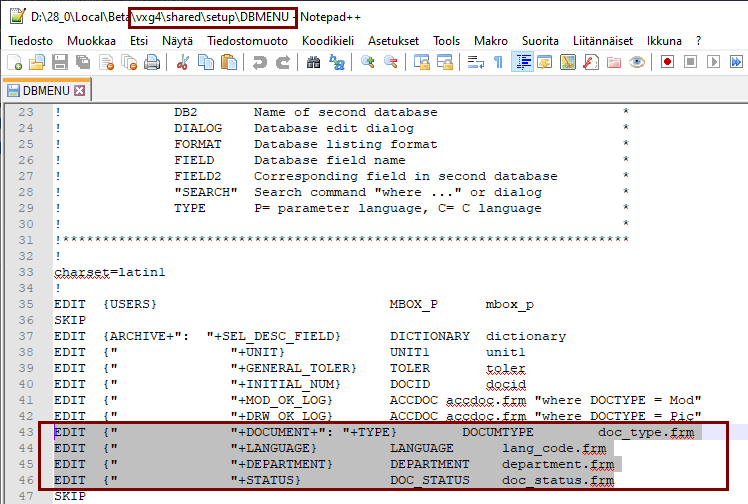
The DBMENU file defines which functions are displayed in the Application Databases menu described above.
-
If you do not have any customer-specific changes in that menu, you will receive the new selections (framed in red in the previous image) by copying the DBMENU file that came with the Delivery Pack to the old location.
1) Extract the shared.zip inside the installation package, eg to the C:\tmp folder.
2) Name the old ../vxg4(_srv)/shared/setup/DBMENU eg to the name DBMENU.old
3) Copy the new (shared/setup/DBMENU) file to the Vertex G4 system you are using to (../vxg4(_srv)/shared/setup/DBMENU)
Below the old version 27.0 (Vertex 2021) of the Application Databases menu.
-
This needs additions.
Update the contents of the BDMENU by adding the following lines
If you have customized the DBMENU menu, then that menu must be modified (eg with a Notepad texture).
Back up old ../vxg4(_srv)/shared/setup/DBMENU eg to DBMENU.old
Open DBMENU with Notepad or Notepad ++ and add the lines:
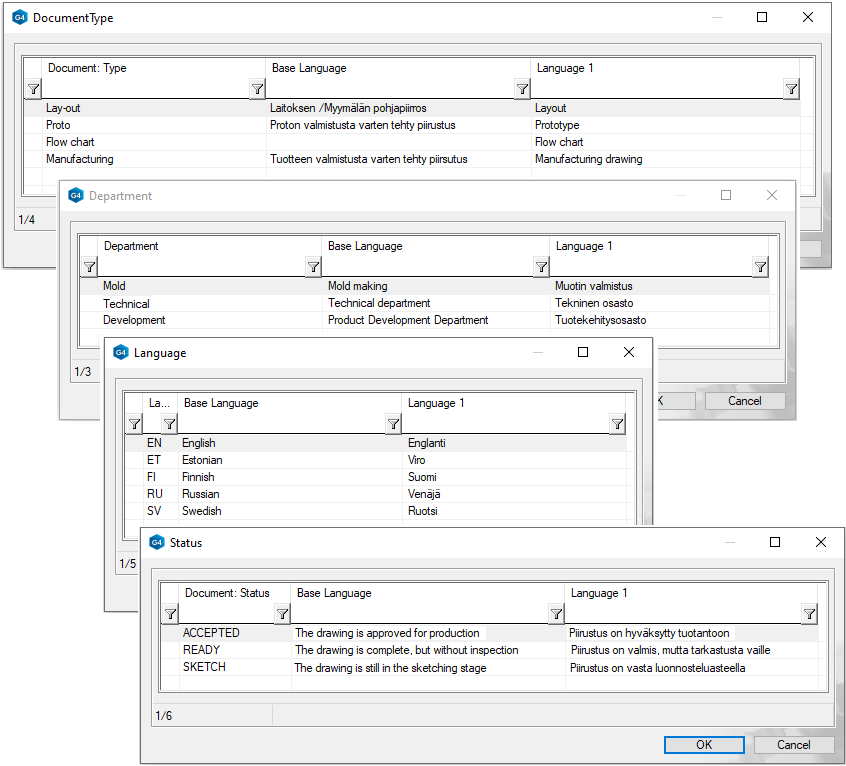
EDIT {" "+DOCUMENT+": "+TYPE} DOCUMTYPE doc_type.frm
EDIT {" "+LANGUAGE} LANGUAGE lang_code.frm
EDIT {" "+DEPARTMENT} DEPARTMENT department.frm
EDIT {" "+STATUS} DOC_STATUS doc_status.frm
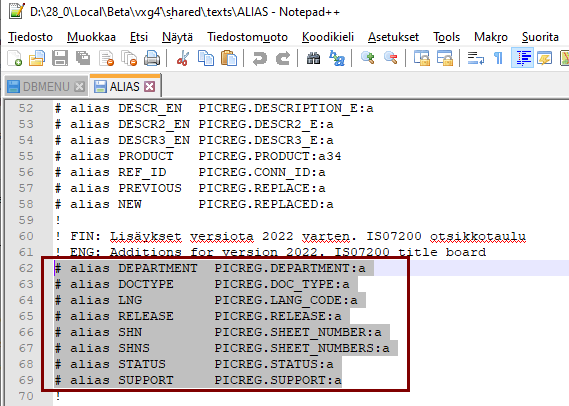
If necessary, complete the custom/texts/ALIAS file
-
If you don't have the ALIAS file in the ../vxg4(_srv)/custom/texts folder, then you don't need to do anything.
-
Note that although we recommend that the custom ALIAS file be saved in the custom/texts folder, some clients have possibly saved it in the ../vxg4(_srv)/shared/texts folder.
Configurations in the ALIAS file are required when the information in the drawing title board is supplemented with information in the drawing archive.
1) Extract the shared.zip inside the installation package, eg to the C:\tmp folder.
2) Copy the old ../vxg4(_srv)/custom/texts/ALIAS eg to the name ALIAS.old
3) Open ALIAS with Notepad or Notepad ++ and add the lines:
# alias DEPARTMENT PICREG.DEPARTMENT:a
# alias DOCTYPE PICREG.DOC_TYPE:a
# alias LNG PICREG.LANG_CODE:a
# alias RELEASE PICREG.RELEASE:a
# alias SHN PICREG.SHEET_NUMBER:a
# alias SHNS PICREG.SHEET_NUMBERS:a
# alias STATUS PICREG.STATUS:a
# alias SUPPORT PICREG.SUPPORT:a
Add new databases
As of version 28.0.00, the delivery package includes the following databases in the vxg4/shared/dbases folder: Document type, drawing language code, responsible department, and document status.
-
These databases are not automatically updated in the vxg4/shared/dbases folder of older installations, but must be copied separately.
Extract the installation package file data/shared.7z somewhere, eg to the C:\temp folder (by no means over the existing vxg4 folder)
Make sure you don't have the files listed below in the vxg4 (_srv)/shared/dbases folder (which someone would have sometimes set up there for some purpose themselves).
Copy the eight files from the extracted package to either the file server you are using (vxg4_srv/shared/dbases) or the single user installation (vxg4/shared/dbases) folder:
-
d_DEPARTMENT (Responsible department)
-
d_DEPARTMENTc
-
d_DOC_STATUS (Document status)
-
d_DOC_STATUSc
-
d_DOCUMTYPE (Document type)
-
d_DOCUMTYPEc
-
d_LANGUAGE (Drawing language code)
-
d_LANGUAGEc
You can also get the above databases if you download the ISO7200Databases.zip package here.
Project field in title table when using Flow with G4
-
If you don't have the ALIAS file in the ../vxg4(_srv)/custom/texts folder, then you don't need to do anything.
-
Note that although we recommend that the custom ALIAS file be saved in the custom/texts folder, some clients have possibly saved it in the ../vxg4(_srv)/shared/texts folder.
If you are using Vertex Flow with G4 and want the project information related to the drawing to be updated to new sheets (Symbols/Standards/FlowSheets_ISO7200), remove the comment mark ! (i.e. exclamation point) from the ../vxg4(_srv)/custom/texts/ALIAS file, from the beginning of the line:
!# alias PDMPROJECT PDMPROJECT.OBJCODE:a
The correct line is:
# alias PDMPROJECT PDMPROJECT.OBJCODE:a
Drawing-archive database update
Updating the main version of the program does not modify the client's (possibly customized) databases, so updating the drawing archive database (d_PICREG) must be done manually.
Below are instructions for defining the format of the drawing archive to add the necessary fields to the database.
These functions must be performed on all G4 installations installed with version 27.0.XX (Vertex 2021) or earlier that want to enable new drawing archive records.
Back up the drawing archive
First, back up the two files that make up the drawing archive, somewhere.
-
Function: File> This software version> Shared.
-
This function opens the vxg4(_srv)/shared folder in Windows Explorer.
-
-
Select the dbases folder.
-
Copy the files d_PICREG and d_PICREGc somewhere secure.

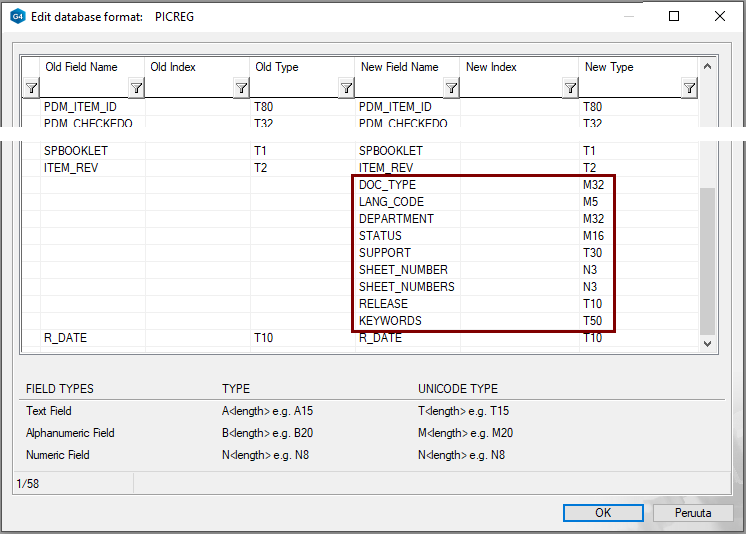
Edit the database
-
System-ribbon > Maintenance > Define structure.
-
Browse to the drawing archive database d_PICREG.
-
Double-click the d_PICREG file
-
The program opens the Edit database format dialog.
-
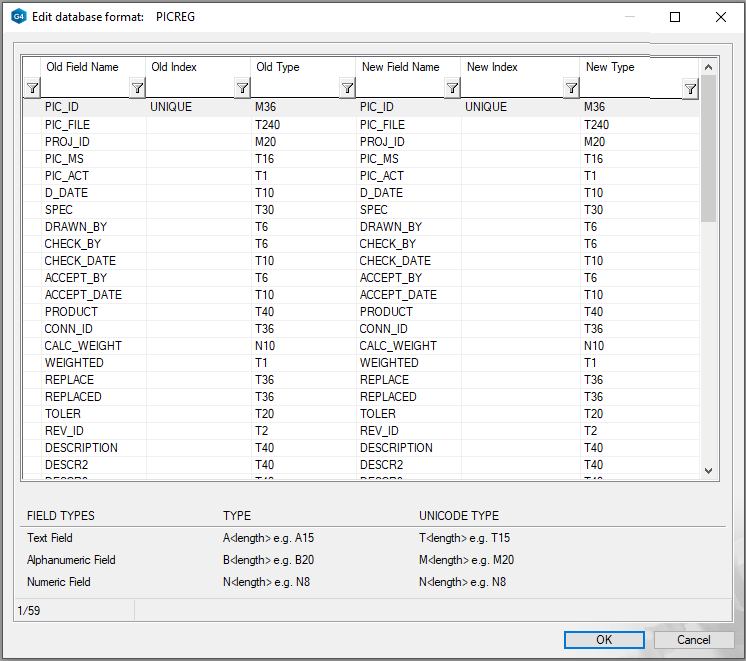
Add row (s)
-
Go to the last line of the database (the scroll bar on the right will take you to the end).
-
Right click function: Add a line after.
-
Add a new line for each field (9 pcs).
-
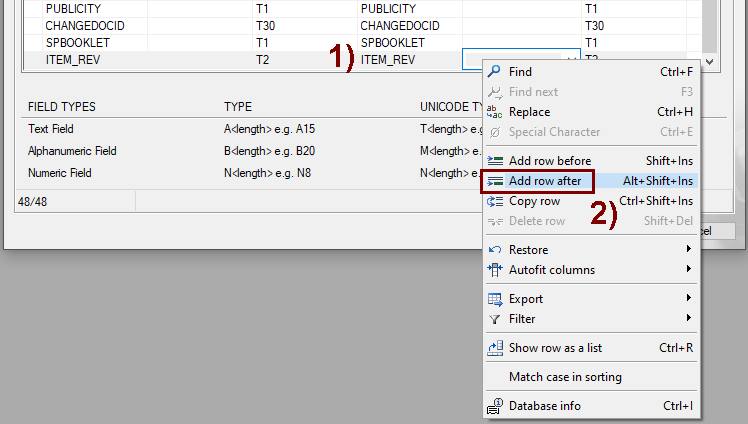
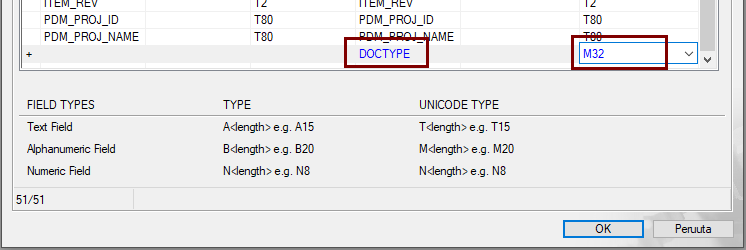
Enter the field name and type
-
In the New Field Name column, type the field name in the same style as described below.
-
Use capital letters.
-
Note that some field names have an underscore, not a space or a hyphen.
-
-
In the New Type column, type the type and length of the field.
-
The first book tells you the type (M = Alphanumeric field, T = Text field, N = Numeric field).
-
The number following the letter indicates the length of the field.
-
Add the following fields
-
DOC_TYPE, M32
-
LANG_CODE, M5
-
DEPARTMENT, M32
-
STATUS, M16
-
SUPPORT, T30
-
SHEET_NUMBER, N3
-
SHEET_NUMBERS, N3
-
RELEASE, T10
-
KEYWORDS, T50
Save the information
-
Press the OK button.
-
If the program asks for a save, answer Yes.
If you do not want new fields in your drawing archive
General information
The drawing archive is dealt with in the so-called form files that involve application development programs.
The following form files have been modified for the new fields.
-
system/forms/pic_form (Creates a drawing archive card when drawing data is entered).
-
system/forms/pic_srch (Used to enter search criteria when you click Documents > Drawing in your browser).
-
system/forms/selpic_form (Used to enter search criteria when drawings are listed for editing, cataloging, or deletion).
-
system/forms/browse_pic (Used when editing drawing archive data after retrieving data).
As a result, the new fields appear on the archive card, even if the fields in question have not been added to the drawing archive database.
-
However, you cannot add information to these new fields.
Return to using the old forms and application programs
-
Save the file in the C:\temp folder, for example.
-
Extract the compressed file.
-
Copy the contents of the Old_Archive\custom\forms folder to the vxg4 (_srv)\custom\forms folder.
-
Copy the contents of the Old_Archive\custom\macros\proj folder to the vxg4 (_srv)\custom\macros folder.
-
Restart the Vertex G4, after which you will use the old forms.
You may have customizations made in the past that result in files in the custom/forms and custom/macros folders with the same name as described here.
-
If there are any, and you want to keep the old archive formats, then do not copy these files over files of the same name already in the custom folder.