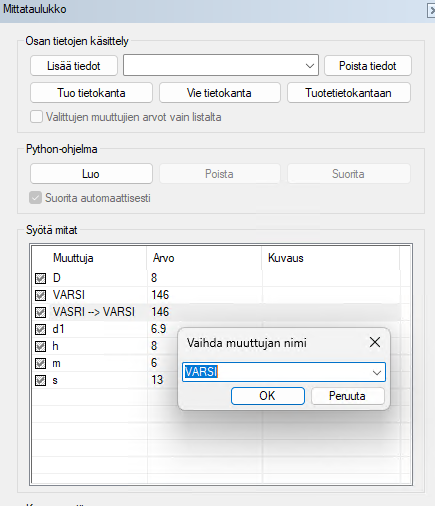
Renaming a Dimension Variable
Rename the condition variable via the dimension table across the entire model hierarchy.
Change the dimension variable name throughout the entire model hierarchy.
Have you ever encountered a misnamed dimension? You can now easily fix this issue through the dimension table. This saves time by avoiding unnecessary recalculations and clarifies variability issues within the model. By doing so, you speed up the reuse of models and reduce errors.
When Might You Want to Rename Dimensions?
Incorrect Capitalization:
A common issue is inconsistent capitalization of dimension names. For example, "Pituus" and "pituus" are treated as two separate dimensions and will appear as different rows in the dimension table.Conflict with Assembly Variables:
When adding a part to an assembly, you might encounter a situation where the part and the assembly share a variable name. To avoid breaking functionality in other assemblies where the part is used, it's useful to rename the assembly variable to something else first.Standardizing Terminology:
Designers creating design automation can synchronize terminology across multiple assemblies. This enables the use of a unified interface or Python code, as variable names remain consistent across different products.
How to Rename Variables
Open the Dimension Table. Locate the variable you want to rename.
Right-click on the variable and select Rename Variable.
After renaming, the table will display a note indicating the variable’s previous name. This is helpful if you decide to revert the name later.
Once you confirm the changes with the OK button, the model will resolve using the updated values. During this process, all local parts and assemblies in the model hierarchy will be checked, and their dimension variables will be updated accordingly.
This streamlined process saves time, reduces errors, and enhances consistency in model reuse and automation.

