
General
Most naturally, views facilitate searches related to customer-specific (i.e., company-defined) attribute fields.
The customer-specific fields and the selection lists (attributes) formed by their contents, which are utilized by views, are usually created during the initial implementation of Flow, so they do not need to be created separately for the views.
About views in general: Views
To create views successfully, make sure that
Objects have the necessary fields for views
-
Add a Select-type field to objects if needed.
-
See: Edit object cards for views T
The selection lists (attributes) needed for views are created
-
If the view is based on customer-specific fields, add the necessary attributes (e.g., C_FACTORY) for each level of the view hierarchy, as they need to be selectable when adding the view.
-
You do not need to add the attribute if the view is based on object types (Objects) or object state models (States of Type), or if the attribute already exists.
-
See: Create selection lists
Add view
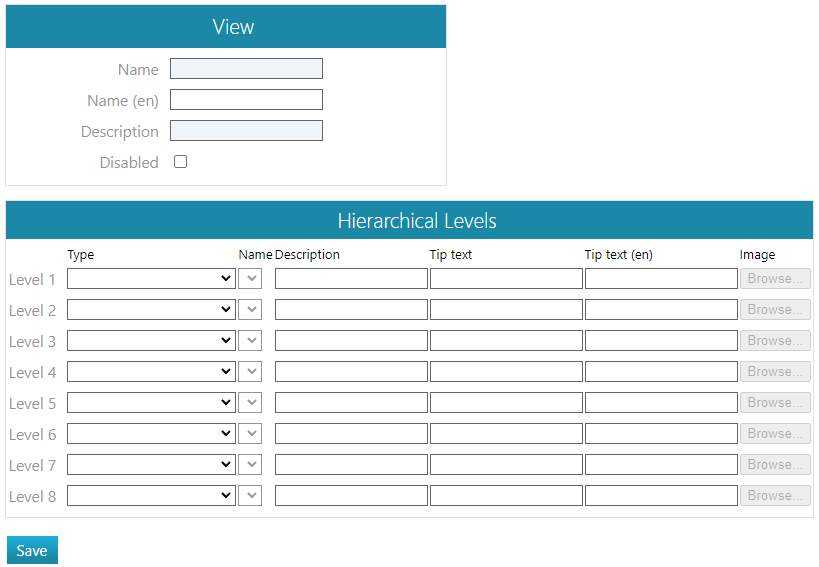
(1) Select the View tab.
(2) Select the contextual action New View,
-
Flow opens the View dialog box.
(3) Enter the View name and optionally an English name.
(4) Enter the description of the view.
-
This will appear as a tooltip if you hover over the view.
(5) Choose the selection type for Level 1.
-
Default (Attribute Values) = The view is based on Flow system attributes, such as customer-specific fields.
-
Objects = The view is based on object types like product or project.
-
States of Type = The view is based on object types.
(6) Select Name for Level 1.
-
The name depends on the previous selection.
-
Default: Attributes are available for selection.
-
Objects: Products or projects available in the system can be selected.
(7) Enter the description for Level 1.
-
The description will only appear on this definition page, not in the actual interface.
(8) Enter tooltip text and tooltip text (EN) for Level 1.
-
The tooltip text will appear if you hover over the View.
(9) Optionally, choose an icon for Level 1 that will appear above the view.
(10) If the view is multi-level, repeat steps 5...9 for Level 2, etc.
(11) Select the Save action.
(12) Exit the view creation by selecting any object from the Archive.
Icons
The icons for view levels are ready in the system.
-
You cannot create custom icons for views.