
General
Permission rules define default permissions for objects:
-
When an object is created, it receives permissions according to the permission rules.
A permission rule consists of conditions and a permission table.
-
Conditions are composed of choices related to property data, typically object type and classification.
-
Example: "if the object type is item and its classification is Sensors".
-
In addition to object type and classification, conditions can include status, public access level, and owner organization.
The permission table specifies the rights of different user groups to objects that meet the conditions of the permission rule. Example: only the Product Development team can view draft G4 documents.
Regarding permissions: Permissions
Only the administrator can modify permission rules
The main steps in establishing a permission rule
-
Create a new permission rule first using the New function and save it with Create.
-
Open the permission rule again for editing and define its conditions.
-
Save the conditions.
-
Finally, define the permission table associated with the rule.

Example of permission rules
(1) Select the Portal function from the user menu.
(2) Select System Administration > Users and Permissions > Permission Rules.
-
Flow lists the permission rules.
The order number of the permission rule (column Order) indicates the sequence in which Flow applies the rules.
-
If an object with its properties matches two permission rules, the object receives permissions from the rule with the lower order number.
Ensure that no active object type is left undefined in the rules.
-
If an object type remains outside the scope of permission rule definitions, no user can access the object.
Keep the rule set simple.
-
There is no limit to the number of defined permission rules, but the more rules in use, the more complex they are to manage.
If your company's Flow system includes confidential documents for executives or administration, it's important to define the classifications and permission rules for these documents and carefully test their visibility.

Create a new permission rules
(1) Select the Portal function from the user menu.
(2) Select System Administration > Users and Permissions > Permission Rules.
-
Flow lists the permission rules.
(3) Select the New function.
-
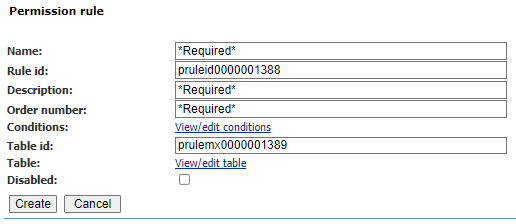
Flow opens the Permission rule dialog.
(4) Enter the rule name in the Name field.
(5) Accept the rule identifier (Rule id) suggested by Flow.
(6) Enter the rule description in the Description field.
(7) Enter the rule order number in the Order number field.
-
Flow processes rules in order of ascending order number.
-
When editing or creating a new object (e.g., an item), the system evaluates permission rules in sequence.
-
When the object's properties match a rule, the object receives the permissions defined by that rule (in the permission table), and Flow does not evaluate any rules with higher order numbers.
(8) Accept the table identifier (Table id) suggested by Flow.
(9) Select Disabled.
-
This is recommended initially when creating a new permission rule to prevent objects from unintentionally receiving an associated incomplete permission table.
(10) Select the Create function.
Disablet: Permission Rule is out of order.
-
It's advisable to select this initially when creating a new permission rule, so that objects do not unintentionally receive an associated incomplete permission table.
-
Clear the checkbox only when the definition work is complete.
Define conditions and permission table
(11) Select the permission rule you created.
(12) Define the rule conditions by selecting View/edit conditions.
-
With conditions, you specify the object types and attributes that must match for the new/modified object to receive the associated permission table.
(13) Define the rule's permission table by selecting View/edit table.
(14) Finally, deselect Disable.
(15) Test the permission rule.
Define the conditions of the rule
(1) Select the Portal option from the user menu.
(2) Select System Administration > Users and Permissions > Permission Rules.
-
Flow lists the permission rules.
(3) Select the permission rule.
(4) Click on the link View/edit conditions.
-
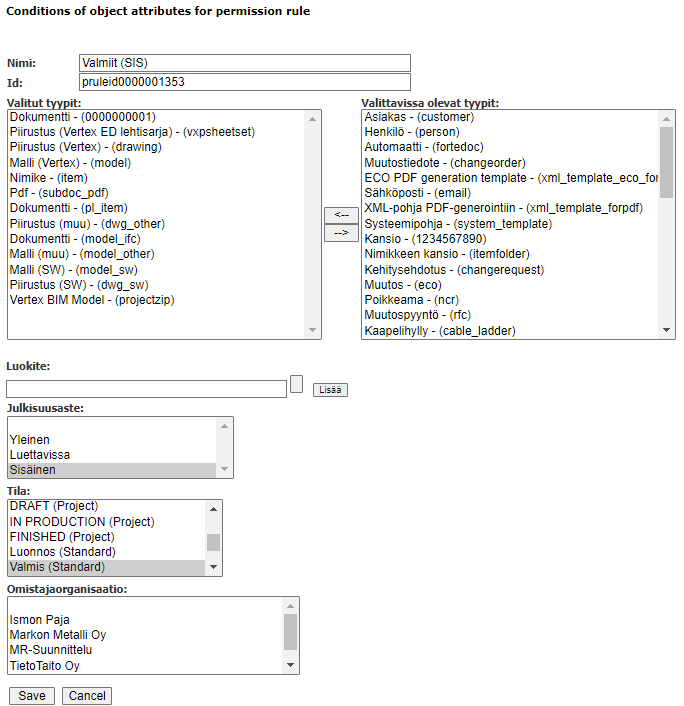
Flow opens the Conditions of object attributes for permission rule dialog box.
-
Name and Id: The rule name and ID are inherited from the permission rule.
(5) Move the object types that the rule applies to into the Selected types column.
-
Select the object type from the Available types column.
-
Click the transfer button.
Do not leave the Types condition empty. An empty Selected types column means all types, but in that case, at least one other condition must be selected.
(6) Move the object types to the Available types column that the rule does not apply to.
-
Select the object type from the Selected types column.
-
Click the move button.
(7) If necessary, select the Classification required for the rule to apply to the object.
-
You can leave the Classification field empty, which means the object's classification will not affect the rights granted.
-
You can select one or more classifications.
-
Click the Add button to add a new classification.
-
You can remove a classification by clearing the field.
-
In the example image, the classification selection is left empty, so the object's classification does not affect the rule.
(8) If necessary, select the Publicity Level required for the rule to apply to the object.
-
You can leave the Publicity Level parameter empty, which means the object's publicity will not affect the rights granted.
-
Note that if you use the publicity parameter as a condition, the user must remember to select the correct publicity for the object when creating it.
-
Often, the classification is used instead of the publicity level to restrict access.
-
When an object is created through the classification tree, it automatically gets the correct classification. For example, with the classification Management|Management Team, the visibility of the document could be defined for the management team only.
(9) If necessary, select the Status required for the rule to apply to the object.
-
The status defines the workflow of the object.
-
Different object types can have different status models.
-
You can leave the status model unselected, which means the object's status will not affect the rights granted. In the example, the rule only applies to objects in the Final status.
(10) If necessary, select the Owner Organization required for the rule to apply to the object.
-
You can leave it unselected, which means the object's organization will not affect the rights granted.
-
Generally, it is left empty, as in the example, because the owner organization field is not included in Flow's default installations.
(11) Select the Save action.
Example:
Define Permission Table
(1) Select the Portal option from the user menu.
(2) Select System Administration > Users and Permissions > Permission Rules.
Flow lists the permission rules.
(3) Select the permission rule.
(4) Select the link View/edit table.
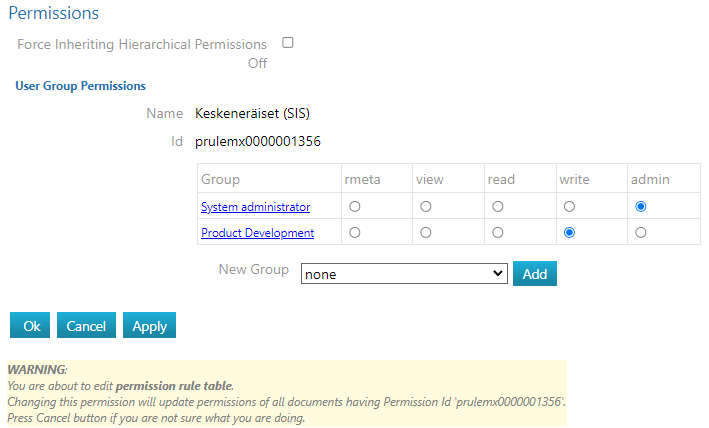
Flow opens the dialog box Permissions. Name and Id: The rule's name and ID are inherited from the permission rule. If the table did not previously exist, only the System administration group with read rights is selected by default for objects matching the rule's conditions.
(5) Select the group to which you want to grant some rights based on the permission rule.
Click the selection button in the New group field. Flow opens a list of groups. Select the group.
(6) Select the Add action.
Flow adds the group to the table without any rights.
(7) Select the right.
Refer to Permission Table. Select all rights (admin) for the system administration group.
(8) Select the Execute action.
The group and the granted rights are saved.
(9) Repeat steps 5 through 8 as needed until all necessary groups are added to the permission table.
(10) Save the table by selecting the OK action.
Edit permission rule
You can modify the permission rule later as needed.
-
You can change the order number of the permission rule, moving it up or down the list.
-
You can change the conditions, e.g., add an object type to the conditions.
-
You can modify the table, e.g., add or remove a user group from the table.
-
Click open the desired permission rule and make the changes. Save by clicking Save.
Changes to the permission table associated with a permission rule will automatically update for the objects, but changes to the conditions of the permission rule will only apply to objects created after the permission rule is saved.
-
However, you can update permission rules for existing objects through the trolley.
-
Place the objects in the trolley, select Attributes from the trolley dropdown menu, and in the dialog that opens, check the box for According to permission rules.
Default permission rule
In Flow, there is a permission rule called Default Permission Rule. The associated permission matrix is assigned to an object if no other rule matches.
-
In this case, System Administrators have all rights, while others have no rights.
-
The idea is that such a situation requires changes to the permission rules, which can be made by the System Administrators.