
Your company's own component libraries and other files modified for your own use are located in the customer-specific environment of the program. Changes may have been made to the files in the system folder of the new program version, which should also be updated in the files in the customer-specific environment. Usually, these changes are related to the component library databases, where new fields are added or the type or length of existing fields is changed. These changes are updated to the customer-specific environment using the custom folder update function.
Implementing and updating a customer-specific environment in the new Vertex BD 2026 (32.0) program version depends on the location of the environment and the installation method of the new program version.
-
The environment can be:
-
On the computer disk - The environment files are in the program's custom folder and the buildings in the shared folder.
-
In the Vertex Sync service - The environment files and buildings are located in the Vertex Sync service. Users download the environment and working copies of the buildings from the Sync service to their own computer.
-
-
Installation can be done in two ways:
-
Perform a new installation - A new installation allows you to use Vertex BD 2026 (32.0) and a previous version of the program at the same time. The previous version of the program is still available, and you can test the new version before its final deployment.
-
Update the previous installation - The installer allows you to update Vertex BD version 2025 (31.0) to version 2026 (32.0). Upgrading will convert your existing installation to the new version. This is the easiest option from an installation point of view. If you want to test the new version first, which is highly recommended, create a separate parallel installation before upgrading the current one.
-
Note
-
Buildings edited and opened with version 2026 (32.0) cannot be opened with an older version, so it is recommended to keep the original copies of the buildings during the transition period when you are using a local building archive.
-
When buildings are in the Vertex Sync service, you can use revisions to manage buildings. As long as a revision created with the previous program version is kept, you can return to it later if needed. For this reason, we recommend that you create a new revision of the building when you save it with the new program version (Vertex BD 2026, 32.0.x) for the first time.
-
In Vertex BD - Vertex Sync integration, we support the latest main version of Vertex BD and its two latest patches. The two latest patches of the previous main version are supported for six months after the release of the new main version.
Instructions on this page:
Environment on the computer disk
Your company's own component libraries and other files modified for your own use are located in the program's custom folder and buildings in the shared folder. You can start using the new Vertex BD 2026 (32.0) program version by upgrading the previous installation or by performing a new installation. In both cases, changes made to the new program version are updated to the customer-specific files using the custom update function. The function starts automatically when you start the new program version for the first time.
Perform a new installation
Install the new Vertex BD 2026 (32.0) according to the instructions. See detailed installation instructions.
Copy the customer-specific custom and shared folders from the previous installation over the standard Vertex BD 2026 (32.0) folders.
Note
-
Copy over, so you can use the new custom folder files that come with the standard version.
The standard delivery of Vertex BD 2026 (32.0) version includes one or more template buildings depending on the localization. To ensure that you get the latest standard template buildings in addition to your own template buildings, do the following:
-
Make a copy of the template building folders included in the Vertex BD 2026 (32.0) standard version. They are located in ../shared/template/projects. Copy them to C:\temp, for example.
-
Copy the custom and shared folders from the previous version to the Vertex BD 2026 (32.0) standard version.
-
Select "Replace original files" when the operating system asks you to.
-
Delete the standard template building folders copied from the previous version. Alternatively, you can rename the folders if you wish to keep the template buildings in question.
-
Move the template building folders from the C:/temp folder to the ../shared/template/projects folder of the Vertex BD 2026 (32.0) version.
If you know that the ../user/SETUP file contains customer-specific settings, copy them from the ../user/SETUP file of the previous version to the ../user/SETUP file of the Vertex BD 2026 (32.0) version.
Note
-
Only copy the settings from one file to the other, do not replace the ../user/SETUP file of the new version with the file of the previous version.
Enable the system administration functions by setting the keyword set.system.menu= 1 in the ../user/SETUP file.
Start Vertex BD.
The custom update function will start automatically. Select the version you last used from the Previous update list. If you last updated to version 2025 (31.0), it will be selected in the list by default.
Confirm by clicking OK. The custom folder will take a moment to analyze. Finally, you will receive a list of the actions taken. See Files to be uploaded.
Test Vertex BD version 2026 (32.0) before deploying.
Upgrade the previous installation
Only upgrade the previous installation if the installation folder name does not use a version number. If the previous installation folder name used a version number, for example C:\Vxbd310, perform a new installation to avoid confusion.
The upgrade function only replaces the program's system folder, leaving the custom and shared folders intact. However, we recommend that you back up your system before upgrading your installation. This can be done by copying the main folder of the Vertex BD program with its subfolders to another location on the disc or elsewhere on the network.
When installing Vertex BD 2026 (32.0) program, new installation is the default. Change the installation method to Upgrade. If necessary, select the installation to be upgraded from the list if there are multiple installations. See detailed installation instructions.
After you have upgraded the installation and started the program, the custom update function will start automatically. The custom folder will take a moment to analyze. Finally, you will receive a list of the actions taken. See Files to be uploaded.
Note
-
The installer can only update from one version to the next, i.e. from version 2025 (31.0) to version 2026 (32.0). If the version in use is older than 2025 (31.0), perform a new installation.
Environment in the Sync service
Your company's own component libraries and other files modified for your own use as well as the buildings are located in the Vertex Sync service. You can start using the new Vertex BD 2026 (32.0) program version by upgrading the previous installation or by performing a new installation. The Vertex Sync service was first available with Vertex BD 2025 (31.0) version, and this version can be upgraded to 2026 (32.0) version using the installer. Upgrading can only be performed using the installer from one version to the next.
Uploading and updating a customer-specific environment to Sync is only possible for the system administrator, so only the system administrator should update the environment on their own machine, and then upload the environment to Sync. After the custom update with Vertex BD 2026 (32.0), the environment must be uploaded to Sync as a new environment, as Sync stores information about the program version with which the customer-specific environment was last uploaded to the service and it can only be updated to Sync with the same program version. Therefore, an environment uploaded with the previous version can no longer be updated to Sync with Vertex BD 2026 (32.0).
Once the system administrator has uploaded the environment to the Sync service, other users can download the environment from the service to their own disk.
Perform a new installation
Install the new Vertex BD 2026 (32.0) according to the instructions. See detailed installation instructions.
Start Vertex BD 2026 (32.0).
Set the Sync organization by selecting File > Preferences > User default settings. Select the Sync tab. Enter the name of the Sync organization and select other settings.
Restart Vertex BD, and log in to Sync service.
Set the customer-specific environment from the Sync service in use by selecting Archives | Sync | Environments.
After you have selected the environment, the program will restart and the custom folder update function will start automatically. The function updates the changes made to the program version to the customer-specific files. Analysis of the Custom folder takes a while. Finally, you will see a list of the conducted measures. See Files to be uploaded.
After you have updated the customer-specific environment with the Vertex BD 2026 (32.0) program, upload it as a new environment to the Sync service using the Archives | Sync | Environments > Create a new environment in Sync. Enter a name and description for the environment.
Other users will be notified about the new environment and can then download it from Sync. They only need to restart the program to start using it.
Note
-
If you perform a new installation, make sure that all buildings you have been working on are synchronized to Vertex Sync before you start using the new program version. This ensures that the latest saved versions of the buildings are available when you open them with the new version.
Upgrade the previous installation
Only upgrade the previous installation if the installation folder name does not use a version number. If the previous installation folder name used a version number, for example C:\Vxbd310, perform a new installation to avoid confusion.
The upgrade function only replaces the program's system folder, leaving the custom and other installation folders intact.
Before upgrading the program version, check and download if necessary the latest environment from the Sync service to your installation using the Archives | Sync | Environments > Download and apply latest environment function.
When installing Vertex BD 2026 (32.0) program, new installation is the default. Change the installation method to Upgrade. If necessary, select the installation to be upgraded from the list if there are multiple installations. See detailed installation instructions.
After you have upgraded the installation and started the program, the custom update function will start automatically. The function updates the changes made to the program version to the customer-specific files. Analysis of the Custom folder takes a while. Finally, you will see a list of the conducted measures. See Files to be uploaded.
After you have updated the customer-specific environment with the Vertex BD 2026 (32.0) program, upload it as a new environment to the Sync service using the Archives | Sync | Environments > Create a new environment in Sync. Enter a name and description for the environment.
Other users can then download the environment from Sync.
Template buildings and the layer scheme
You can use customer-specific template buildings, or you can use the template buildings of the software supplier.
The layer scheme that you use can be:
-
The layer scheme of the software supplier saved in the system settings.
-
A customer-specific layer scheme saved in the drawing file in the ../custom/setup/layer-templates folder.
In either case, changes may have been made to the layer scheme that has not been updated in template buildings.
When you create a new building, select Update layer scheme in the dialog box to load the current layer scheme into the new building and update the changes made to the layer scheme to the building drawings. The selection will be saved, and it will be used whenever you start a new building based on a template building.
Update function
Update software version changes to custom fitted files by using the system update function. The update function starts automatically when you have followed the steps described above and started the program.
If necessary, you can also start the function by selecting System | Update custom.

Files to be updated
The update function performs the operations described below.
Frame tool libraries of floors, ceilings and roofs
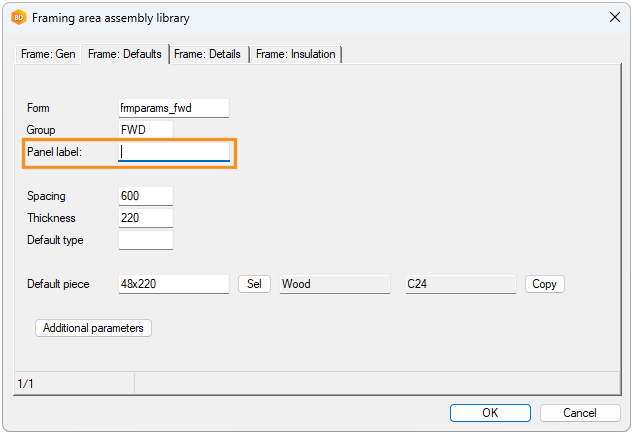
The update function adds the PANEL_LABEL field to the FRMTOOL_FRAMING database of frame tool libraries for customer-specific floors, ceilings, and roofs. It is possible to enter a prefix for the panel label in the field. If the value is empty, the prefix is read from the system settings as before.
Cladding tool library
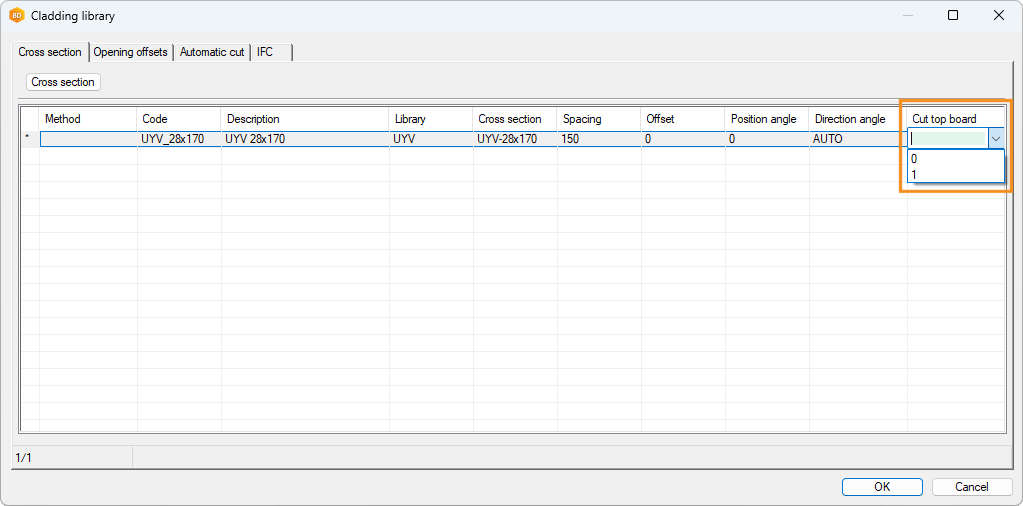
The update function adds the CUT_TOP_BOARD field to the customer-specific cladding tool library database FRMTOOL_CLADDING.
-
With a value of 0, the top board of the cladding layer is not cut, even if it exceeds the top edge of the layer.
-
With a value of 1, the portion of the board that goes over the top edge of the cladding layer is cut.
Profile libraries
The update function removes the unnecessary IFC folder from the customer-specific profile library folder custom/complibs/_proflib/[profile library name]. The folder is related to the old implementation of IFC property sets, which is no longer in use.
Opening trim library
The update function changes the length of the NAME_3DACC field in the OPTRIM_SET database of the customer-specific opening trim library (custom/complibs/optrims_custom). The new length is 60 characters. If the field is already longer than 60 characters, the length is not changed.
Building group library
The update function changes the customer-specific building group library (custom/complibs/bldgmod_custom) to type "building_component_group". The type was previously "macro".
Component library changes related to IFC export
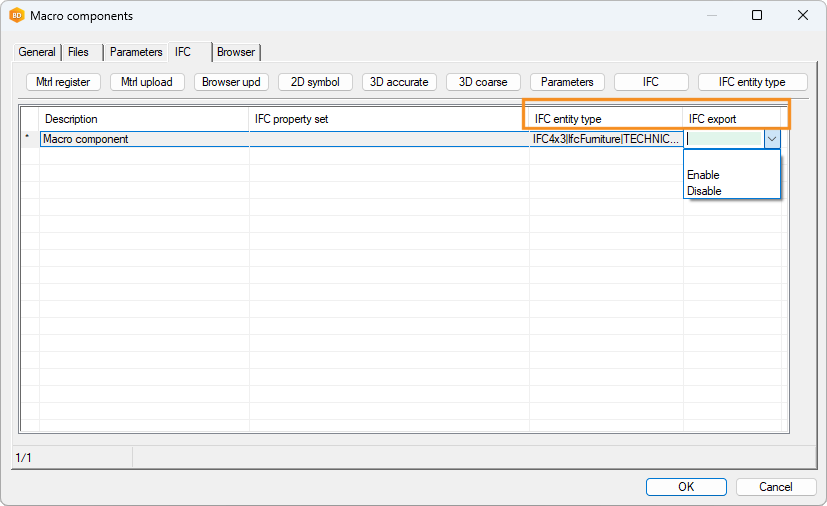
The update function adds the fields IFC_DISABLE and IFC_ENTITY_TYPE to the databases of customer-specific macro component and hanger libraries.
-
IFC_DISABLE - You can prevent or allow the export of a component to an IFC file.
-
IFC_ENTITY_TYPE - You can set the default entity and type (PredefinedType) for the component.
Rooms
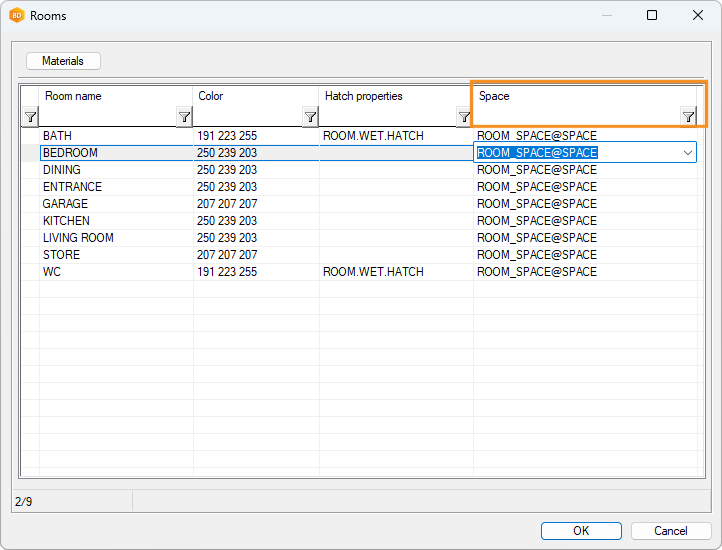
The update function adds the SPACE field to the ROOMS database of the customer-specific room library. It is possible to define a default space for a room in the field. The space is selected from the space library.
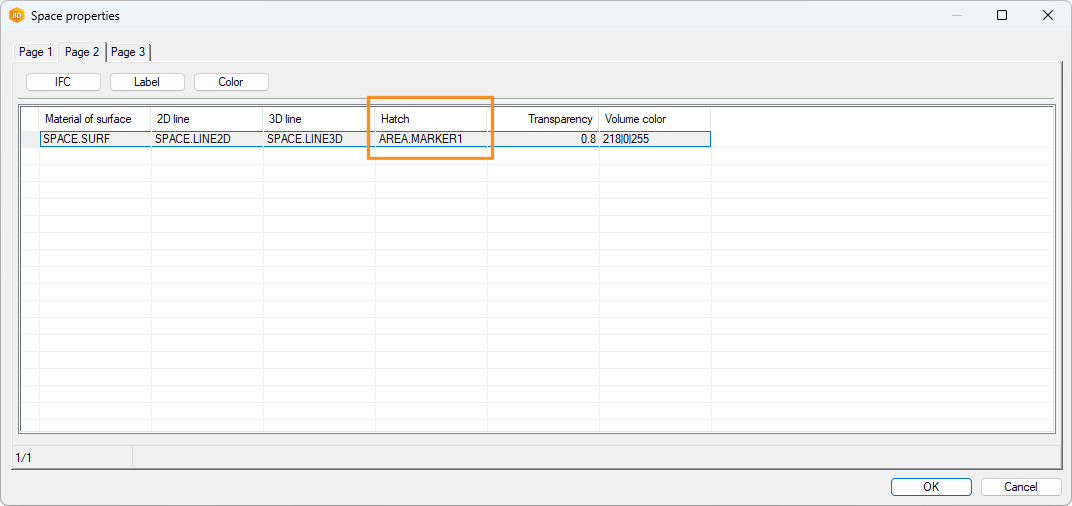
Space library
The update function adds the HATCH2D field to the SPACE database of the customer-specific space library. It is possible to enter a hatch name defined in the system settings in the field.
Thumbnails of building components
The update function converts building component thumbnails from bmp and jpg formats to png format, which is a smaller file format.
Building browser and Vertex Sync
The update function updates the custom/setup/browserdef.xml file, which is used to configure the building browser when the user is logged in to the Sync service. The function renames the CLASS field to LABELS. The field displays the label assigned to the building.
Steel environment
-
Bracket design database:
-
Adds new fields PRIORITY (N4) and LIBRARY (A80) to the BRACKET_DESIGN database.
-
Changes the field CODE type to A32.
-
Renames form files bracket_design and bracket_list to allow system files to be used.
-
-
Adds new fields to frmtool_framing libraries:
-
JST_SHOLE (A1)
-
JST_SHOLE_START (N6)
-
JST_SHOLE_SPAC (N6)
-
JST_SHOLE_DESCR (A32)
-
JST_SHOLE_CODE (A32)
-
JST_SHOLE_LIB (A32)
-
JST_SHOLE_PARAMS (A32)
-
BLK_SHOLE (A1)
-
BLK_SHOLE_DESCR (A32)
-
BLK_SHOLE_CODE (A32)
-
LK_SHOLE_LIB (A32)
-
BLK_SHOLE_PARAMS (A32)
-
HDR_SHOLE (A1)
-
HDR_SHOLE_START (N6)
-
HDR_SHOLE_SPAC (N6)
-
HDR_SHOLE_DESCR (A32)
-
HDR_SHOLE_CODE (A32)
-
HDR_SHOLE_LIB (A32)
-
HDR_SHOLE_PARAMS (A32)
-
-
Service holes:
-
Finds detail files (DEF_DET) from frmtool_framing libraries where DET_GRP = FLR-ST
-
Adds the following row to the detail files:
complete_prog = ADD_SERVICE_HOLES_TO_FLOOR
-
-
Metric steel environment:
-
Adds new parameters to framing tools where DET_GRP = FLR-ST:
-
BEAM = 203x133x30 UB
-
BEAML = Universal_Beam
-
BEAMM = S235
-
-
Adds new framing details:
-
FLR-ST-BEAM-DRP
-
FLR-ST-BEAM-FB
-
FLR-ST-BEAM-FT
-
-
Adds new framing details:
-
ST-EXTCRN-LAD
-
ST-INTCRN-LAD
-
ST-XB2BSTUD
-
ST-W1BOX
-
ST-W2BOX
-
ST-W3BOX
-
ST-W4BOX
-
ST-W5BOX
-
ST-WSIDEBOX
-
ST-WSIDEBOX2
-
ST-WSIDEBOX3
-
ST-WSIDEBOX4
-
ST-WSIDEBOX5
-
ST-CMPD
-
-
Project database
The update function updates the fields in the project database PROREG (in the shared/dbases folder) to Unicode format. For example, a field that was previously of type A is changed to Unicode type T. The list of updated fields opens in the log file shared_update_changes.txt.
Note
-
If the format files connected to the databases are customer-fitted, you must also add the new fields to them, or you can start using the format files in the system folder (system/forms). The files in the system folder will be used when you rename the files in the custom/forms folder.