
Before installation
-
Check the system requirements
-
We support Vertex Flow version 25.0, but we recommend using at least version 26.0.
-
We support SolidWorks 2018 or later.
-
Installation
-
Download the setup program from here: Setup.exe. Flow for SolidWorks does not require a license.
-
Close SolidWorks
-
Run setup.exe as an administrator. The installer might ask you permission to install .NET and update the windows registry, as shown in the picture. These must be allowed.
-
Make sure you have enough permissions to allow the operations mentioned above.
-
When the installation is complete, the program will show the registration path.
-
-
Start SolidWorks
Run setup.exe as an administrator to make sure you have enough permissions
If multiple SolidWorks users use the same workstation, install Flow for SolidWorks separately for all users

Windows registry updating must be allowed
After successful installation, a notification in the picture appears
Setting up a Flow connection
-
Make sure Flow for SolidWorks add-in is on SolidWorks add-in list.
-
Create a new folder in the path \Users\<username>\Documents. The folder is used as Flow workspace where the user's all documents are saved while working.
-
Open Flow for SolidWorks tab on SolidWorks.
-
If the task pane is not visible in SolidWorks, you can set it visible in SolidWorks settings View→Task pane.
-
-
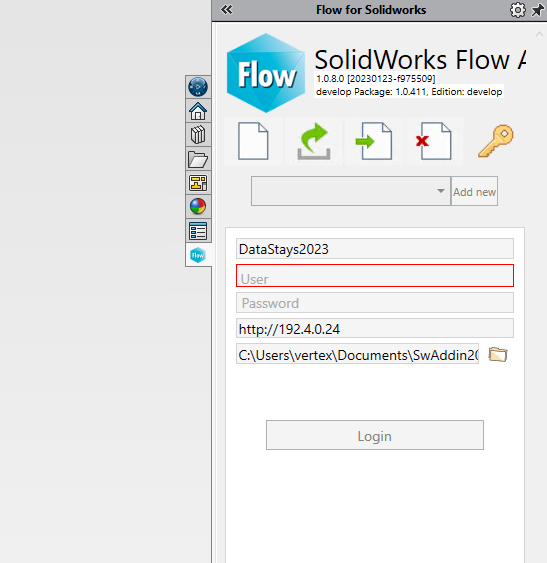
Add new connection
-
Write the same Flow site address as written in the Internet browser address field - starting with http:// (and port if needed) e.g. http://192.4.0.241:22050/
-
Select the previously created workspace directory.
-
Fill username and password.
-
-
Login
You can determine multiple Flow connections in case of test site or subcontracting. Before creating new connections, make sure you have created a new workspace folder for the new connection.
Create also a new workspace folder for each user.
Example: you have two Flow sites VertexFlow1 and VertexFlow2. For VertexFlow1 you use account John Smith. For VertexFlow2 you use accounts John Smith and Testuser. You have to create three workspace folders in total.
Do not use the same workspace folder with the SolidWorks add-in and Flowlet.
Updating Flow for SolidWorks
-
Flow for SolidWorks add-in updates automatically when Vertex Systems releases a new version.
-
You can check release content on release notes: Release Notes
-
-
Flow for SolidWorks checks for the new versions during login to the Vertex Flow.
-
To disable automatic updates, set the update URL keyword value to false in the Flow system settings
-
Flow systems settings keyword = sw.update.url
-
Flow system administrator rights are needed to change the keyword value
-
The predefined value for the value of the keyword sw.update.URL is https://support.vertex.fi/apps/swaddin/rel/v1/